

Build a Blog with Next.js App Router & Headless Hashnode

Director of DevX Engineering @ Cloudinary
One of the biggest pain points of building a blog is figuring out where to write and mange your posts. There is no shortage of Headless CMS options out there, so its important to figure out what makes them special, including a great UX and... one that promotes your blog for you?
Disclaimer: This post is sponsored by Hashnode. Learn more about sponsored content.
What is Headless Hashnode?
Headless Hashnode is a different way to use and interact with the Hashnode platform by using Hashnode's GraphQL API to build your own completely custom project while being able to take advantage of Hashnode's writing and management tools.
The best part is you still get to tap into Hashnode's network, where your post will be shared on the Hashnode website just like it was posted there and each article will link out to your custom site.
What are we going to build?
We're going to use Headless Hashnode to create a new custom blog, using Next.js App Router as the application framework for querying the Hashnode API to display posts, pages, and other content.
While there are Starters available to spin this up without having to custom write everything, we'll explore the APIs and see how we can craft our own blog from scratch or from within your existing project.
For this article, we'll assume that you already have some content in your Hashnode account, but I'll give some tips on what we're working with in each step to give you a chance to fill some out.
It's also worth noting we'll be working out of the Next.js App Router using React Server Components, allowing us to easily drop in our API requests into our component. If you're not using the Next.js App Router, you should be able to follow along by using your own applications data-fetching methods, such as Next.js Page Router's getServerSideProps or getStaticProps.
Tip: Be sure to stick around until the last step, where its critical that you actually turn on Headless Mode before publishing your site to avoid duplicate content.
Step 0: Creating a new Next.js app
We'll be using Next.js for this project. You can either create a new Next.js app from scratch or work on your existing website.
If you want to start from scratch, you can use Create Next App by running:
npx create-next-app@latest my-blog
Which will guide you through configuration options to set up your new project.
I'll be working through an existing project but all examples will be generic enough to be able to be used in any Next.js application!
Step 1: Setting up a Hashnode API client
When working with Hashnode, we'll be interfacing with their GraphQL client. An easy way to not have to set up the same configuration for each request is to create a wrapper function that acts as a somewhat basic Hashnode client.
Generally speaking there are a lot of libraries we can use to write GraphQL queries, where some have better support in the Next.js App Router than others, but we can also just simply use the Fetch API to do this, which is what I'll use in this project.
Tip: Be sure to learn more about how Next.js caches fetch requests so you understand when data will be "fresh".
To start, let's create a new file hashnode.ts inside of a lib directory, which can be in the location of your choosing, but mine will be located at src/lib.
Inside src/lib/hashnode.ts add:
interface Query {
  query: string;
  variables?: object;
  tags?: Array<string>;
}

export async function query({ query, variables, tags }: Query) {
  const data = await fetch('https://gql.hashnode.com', {
    method: 'POST',
    headers: {
      'Content-Type': 'application/json',
    },
    body: JSON.stringify({
      query,
      variables,
    }),
    next: {
      tags,
    },
  }).then((r) => r.json());
  return data;
}
Here we're exporting a new function called query and inside we make a fetch request to the Hashnode GraphQL API endpoint.
We make a POST request, which is what Hashnode supports at this time, set the content type, a body which includes a JSON stringified version of our query and the variables we want to pass for that query, and finally a tags value which represents a cache entry which you can later optionally revalidate on-demand.
What this ends up with is a function that allows us to easily make GraphQL requests to the API of our choice, such as:
await query({
  query,
  variables,
  tags: ['my-query']
})
If you want to get a little familiar with the GraphQL API before we dive in, you can check out the GraphQL Playground or the Documentation.
In the next step, We're going to hit the ground running and see how we can run our first real query with our new query function!
Step 2: Listing Hashnode Posts on a Page
Blog posts are the central content with a Hashnode site, so let's start with how we can find those posts and throw them on a page.
If you haven't written any posts yet, now's a good time, where you can write a new post in your Hashnode account. While we don't need posts, it will give you something to look at.

Once ready, we'll use the Hashnode GraphQL API to query for all of our posts in our page Server Component, then show some data for each one.
Tip: Make sure to have at least one post published, even if just a test post for now, so that the API actually returns some data.
Inside of the page that you want to list your posts such as your homepage in your app directory's root page.tsx file, where in my case I'm working out of src/app/page.tsx, let's first import our new query function:
import { query } from '@/lib/hashnode';
Note: Your import paths may vary depending on where you created the
hashnode.tsxfile and your alias configuration.
Then we can build our Hashnode API query to retrieve our posts.
If you're working out of a Server Component, you'll want to first make sure you make it an async component.
Then, inside of your page component add:
const { data: { publication } } = await query({
  query: `
    query($host: String!) {
      publication(host: $host) {
        posts(first: 10) {
          edges {
            node {
              coverImage {
                url
              }
              id
              publishedAt
              slug
              title
            }
          }
        }
      }
    }
  `,
  variables: {
    host: '<Your Hashnode Host (ex: site.hashnode.dev)>'
  }
});
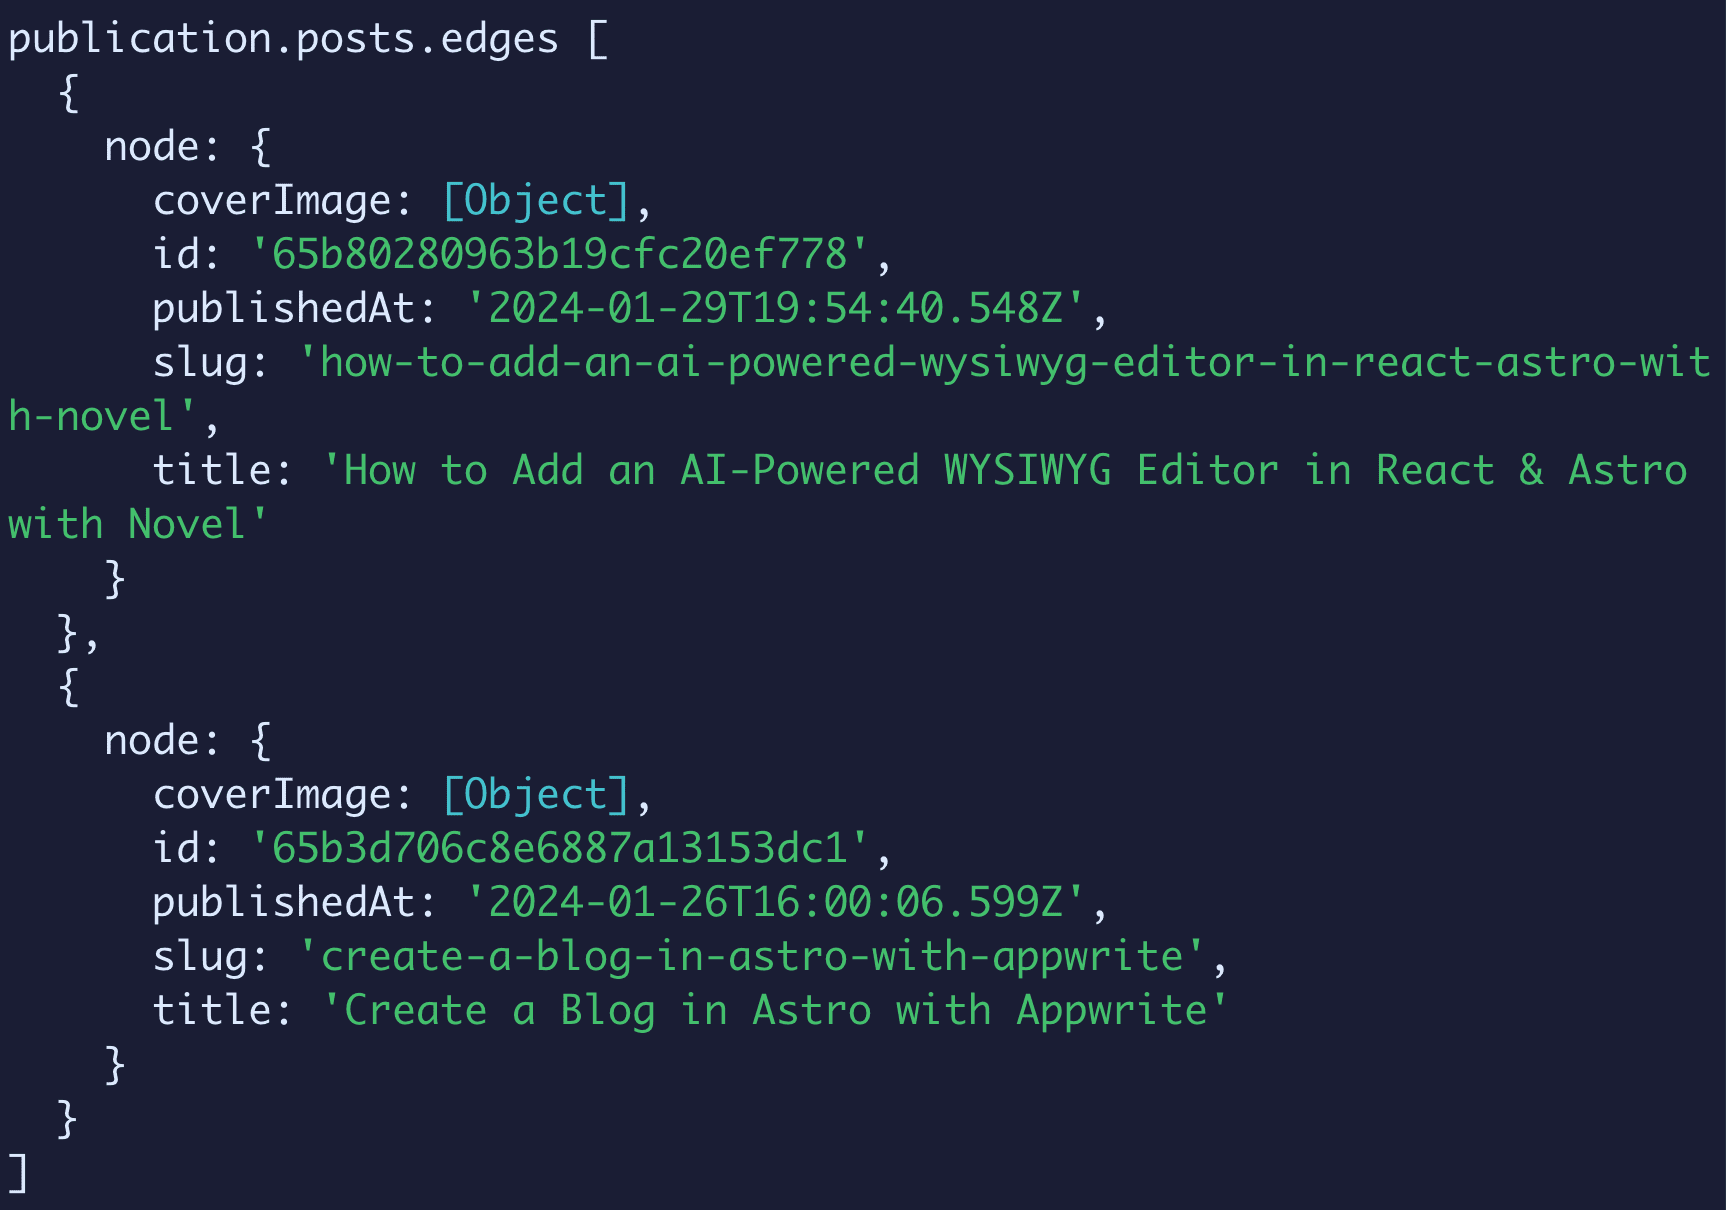
Here we're creating a new query where we retrieve the first 10 posts from a publication where in those posts, we ask for a cover image (if it exists), the ID, the published at date, the slug, and finally the title.
Note: Be sure to update the
hostvariable to your Hashnode site's host, where in my case, mine would bespacejelly.hashnode.dev.
If we try to log out the destructured publication object, we'll be able to see the data we're returned, including an array of objects which will be each post.

If we further inspect that data, we can actually see the post objects and the data inside.
So let's use this data to add the content to our site.
First, let's set up a new posts array including a Post type to more easily work with our data:
interface Post {
  coverImage: {
    url: String;
  };
  id: String;
  publishedAt: String;
  slug: String;
  title: String;
}

const posts: Array<Post> = publication.posts.edges.map(({ node }: { node: Post }) => node);
Then inside of the page, we can map through those posts:
<ul>
  { posts.map((post) => {
    return (
      <li key={post.id}>
        <Image width="600" height="400" src={post.coverImage.url} alt="" />
        <div>
          <h2>{ post.title }</h2>
          <p>
            {
              new Date(post.publishedAt).toLocaleDateString('en-us', {
                weekday: 'long',
                year: 'numeric',
                month: 'short',
                day: 'numeric'
              })
            }
          </p>
        </div>
      </li>
    )
  }) }
</ul>
Here we're looping through each post where we add our cover image, title, and published date which includes some formatting using the Date object and toLocaleDateString. We also use our post ID as a key for our list items to keep React happy.
In the above, for displaying a cover image, I'm using the Next.js Image component
If you don't use cover images, you can simply delete the image.
But if you want to use cover images, you can import the Image component with:
import Image from 'next/image';
You'll also need to configure the Hashnode CDN to be an allowed remote address for loading images with the Image component.
Inside of your next.config.js file, add the following configuration:
const nextConfig = {
  ...
  images: {
    remotePatterns: [
      {
        protocol: 'https',
        hostname: 'cdn.hashnode.com',
      },
    ],
  },
}
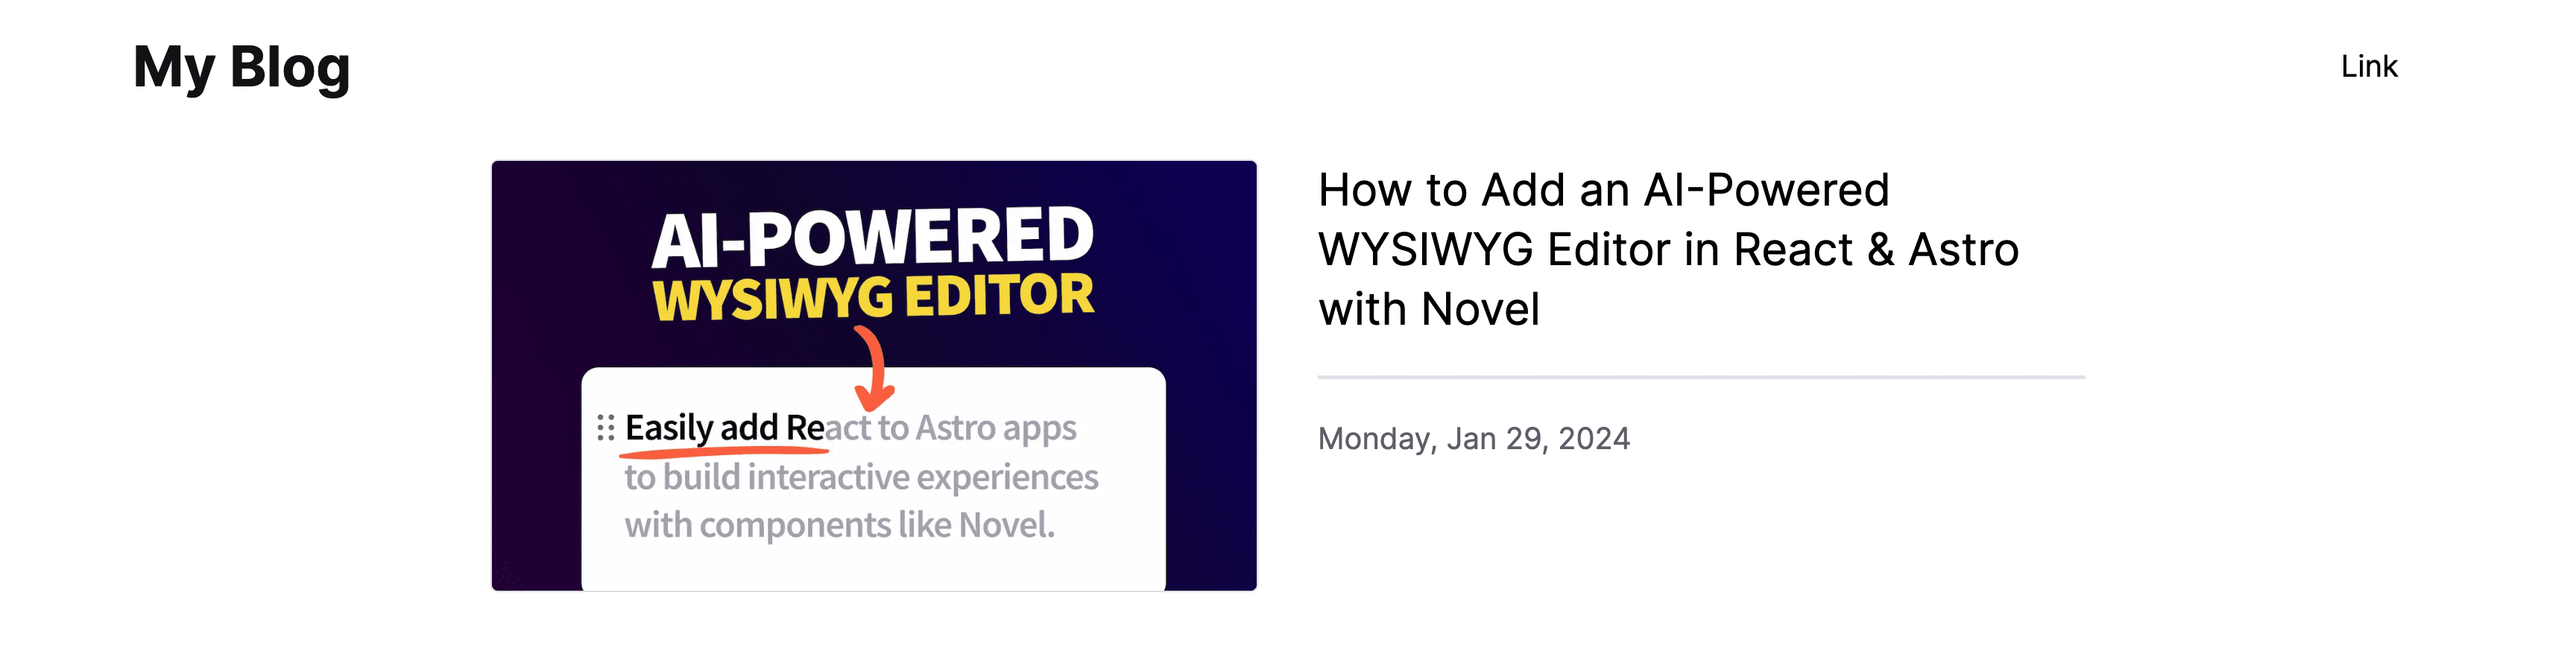
But with all of that configured, we should now be able to see our Hashnode posts displayed in our page!
Tip: If you want to see the Tailwind styles I'm using, you can check out the commit.
Next, we want to link each of those posts to an individual post page, so let's create a new dynamic route where we can query and serve that post.
Step 3: Creating Dynamic Page Routes for Hashnode Posts
To create a unique page for each blog post, we can use Next.js dynamic routes, which allows us to use a parameter as part of our page file's path, which can then be passed to the page itself, where we can then dynamically query for the post's data.
First, let's create our new page path, where inside of the app directory, first create a folder called posts, inside create a folder called [postSlug], and finally create a file inside called page.tsx.
Tip: the brackets (
[]) around "postSlug" in our filename designates our path as dynamic, where "postSlug" is our parameter name.
Inside src/app/posts/[pageSlug]/page.tsx, we can create a basic page:
interface PostParams {
  params: { postSlug: string }
}

export default async function Post({ params }: PostParams) {
  return (
    <div>Post</div>
  )
}
If you notice in our Post function's arguments, we destructure a params object where inside of its given type PostParams, we can see we expect a param of postSlug, which is going to be our dynamic value. We'll use that to query individual posts.
In order to query that data, let's first make sure we import our query function:
import { query } from '@/lib/hashnode';
Next, we can add our post query:
const { data: { publication } } = await query({
  query: `
    query($host: String!, $slug: String!) {
      publication(host: $host) {
        post(slug: $slug) {
          author {
            name
            profilePicture
            socialMediaLinks {
              twitter
            }
          }
          content {
            html
          }
          coverImage {
            url
          }
          id
          publishedAt
          title
        }
      }
    }
  `,
  variables: {
    host: '<Your Hashnode Host (ex: site.hashnode.dev)>',
    slug: params.postSlug
  }
});
Our query looks somewhat similar to our first one, however this time we're querying a single post by passing in a dynamic value of a slug, where the variable comes from our page's postSlug param as described above.
As a convenience, we can again add a new constant of post:
interface Post {
  author: {
    name: string;
    profilePicture: string;
    socialMediaLinks: {
      twitter: string;
    }
  }
  content: {
    html: string;
  }
  coverImage: {
    url: string;
  };
  id: string;
  publishedAt: string;
  title: string;
}

const post = publication?.post as Post;
Now, if you noticed, we just defined our Post types twice, which means we're going to need to maintain that in two different locations, which isn't great. Let's abstract that into a new file.
I like to mainatin a types directory for such things at the same level of my lib directory, so inside of src create a new folder types and inside create a new file posts.ts.
Inside posts.ts add:
export interface Post {
  author: {
    name: string;
    profilePicture: string;
    socialMediaLinks: {
      twitter: string;
    }
  }
  content: {
    html: string;
  }
  coverImage: {
    url: string;
  };
  id: string;
  publishedAt: string;
  slug: string;
  title: string;
}
This includes all of the post properties that we use in both our homepage and our new posts page. We expost the Post interface so we can now import it into those files.
First, let's update our homepage to use our new type, so inside of src/app/page.tsx, first import this with:
import { Post } from '@/types/posts';
Where then we can simply delete the existing Post interface.
Then back inside src/app/posts/[postSlug]/page.tsx, import the same thing above, and similarly remove the manually written Post interface if you added it.
Now we should be left with a little bit cleaner code where now we can start to use our post data to fill out the page.
<article>
  <Image width="984" height="554" src={post.coverImage.url} alt="" />
  <h1>{ post.title }</h1>
  <div>
    <Image width="48" height="48" src={post.author.profilePicture} alt="Author photo" />
    <p>{ post.author.name }</p>
    <ul>
      <li>
        <a href={post.author.socialMediaLinks.twitter}>
          Twitter
        </a>
      </li>
    </ul>
  </div>
  <p>
    Published on
    {` `}
    { new Date(post.publishedAt).toLocaleDateString('en-us', {
      weekday: 'long',
      year: 'numeric',
      month: 'short',
      day: 'numeric'
    }) }
  </p>
  <div dangerouslySetInnerHTML={{
    __html: post.content.html
  }} />
</article>
Here we're not doing much of anything special, mostly filling out the different parts of the page with our dynamic data. Note that we are using the Image component again, so be sure to import it similar to the homepage.
Tip: You can query additional social media links including YouTube and GitHub!
The one thing that's worth noting however is our use of dangerouslySetInnerHTML. Because our post comes back as an HTML string, we can use dangerouslySetInnerHTML to render that HTML string into our div container.
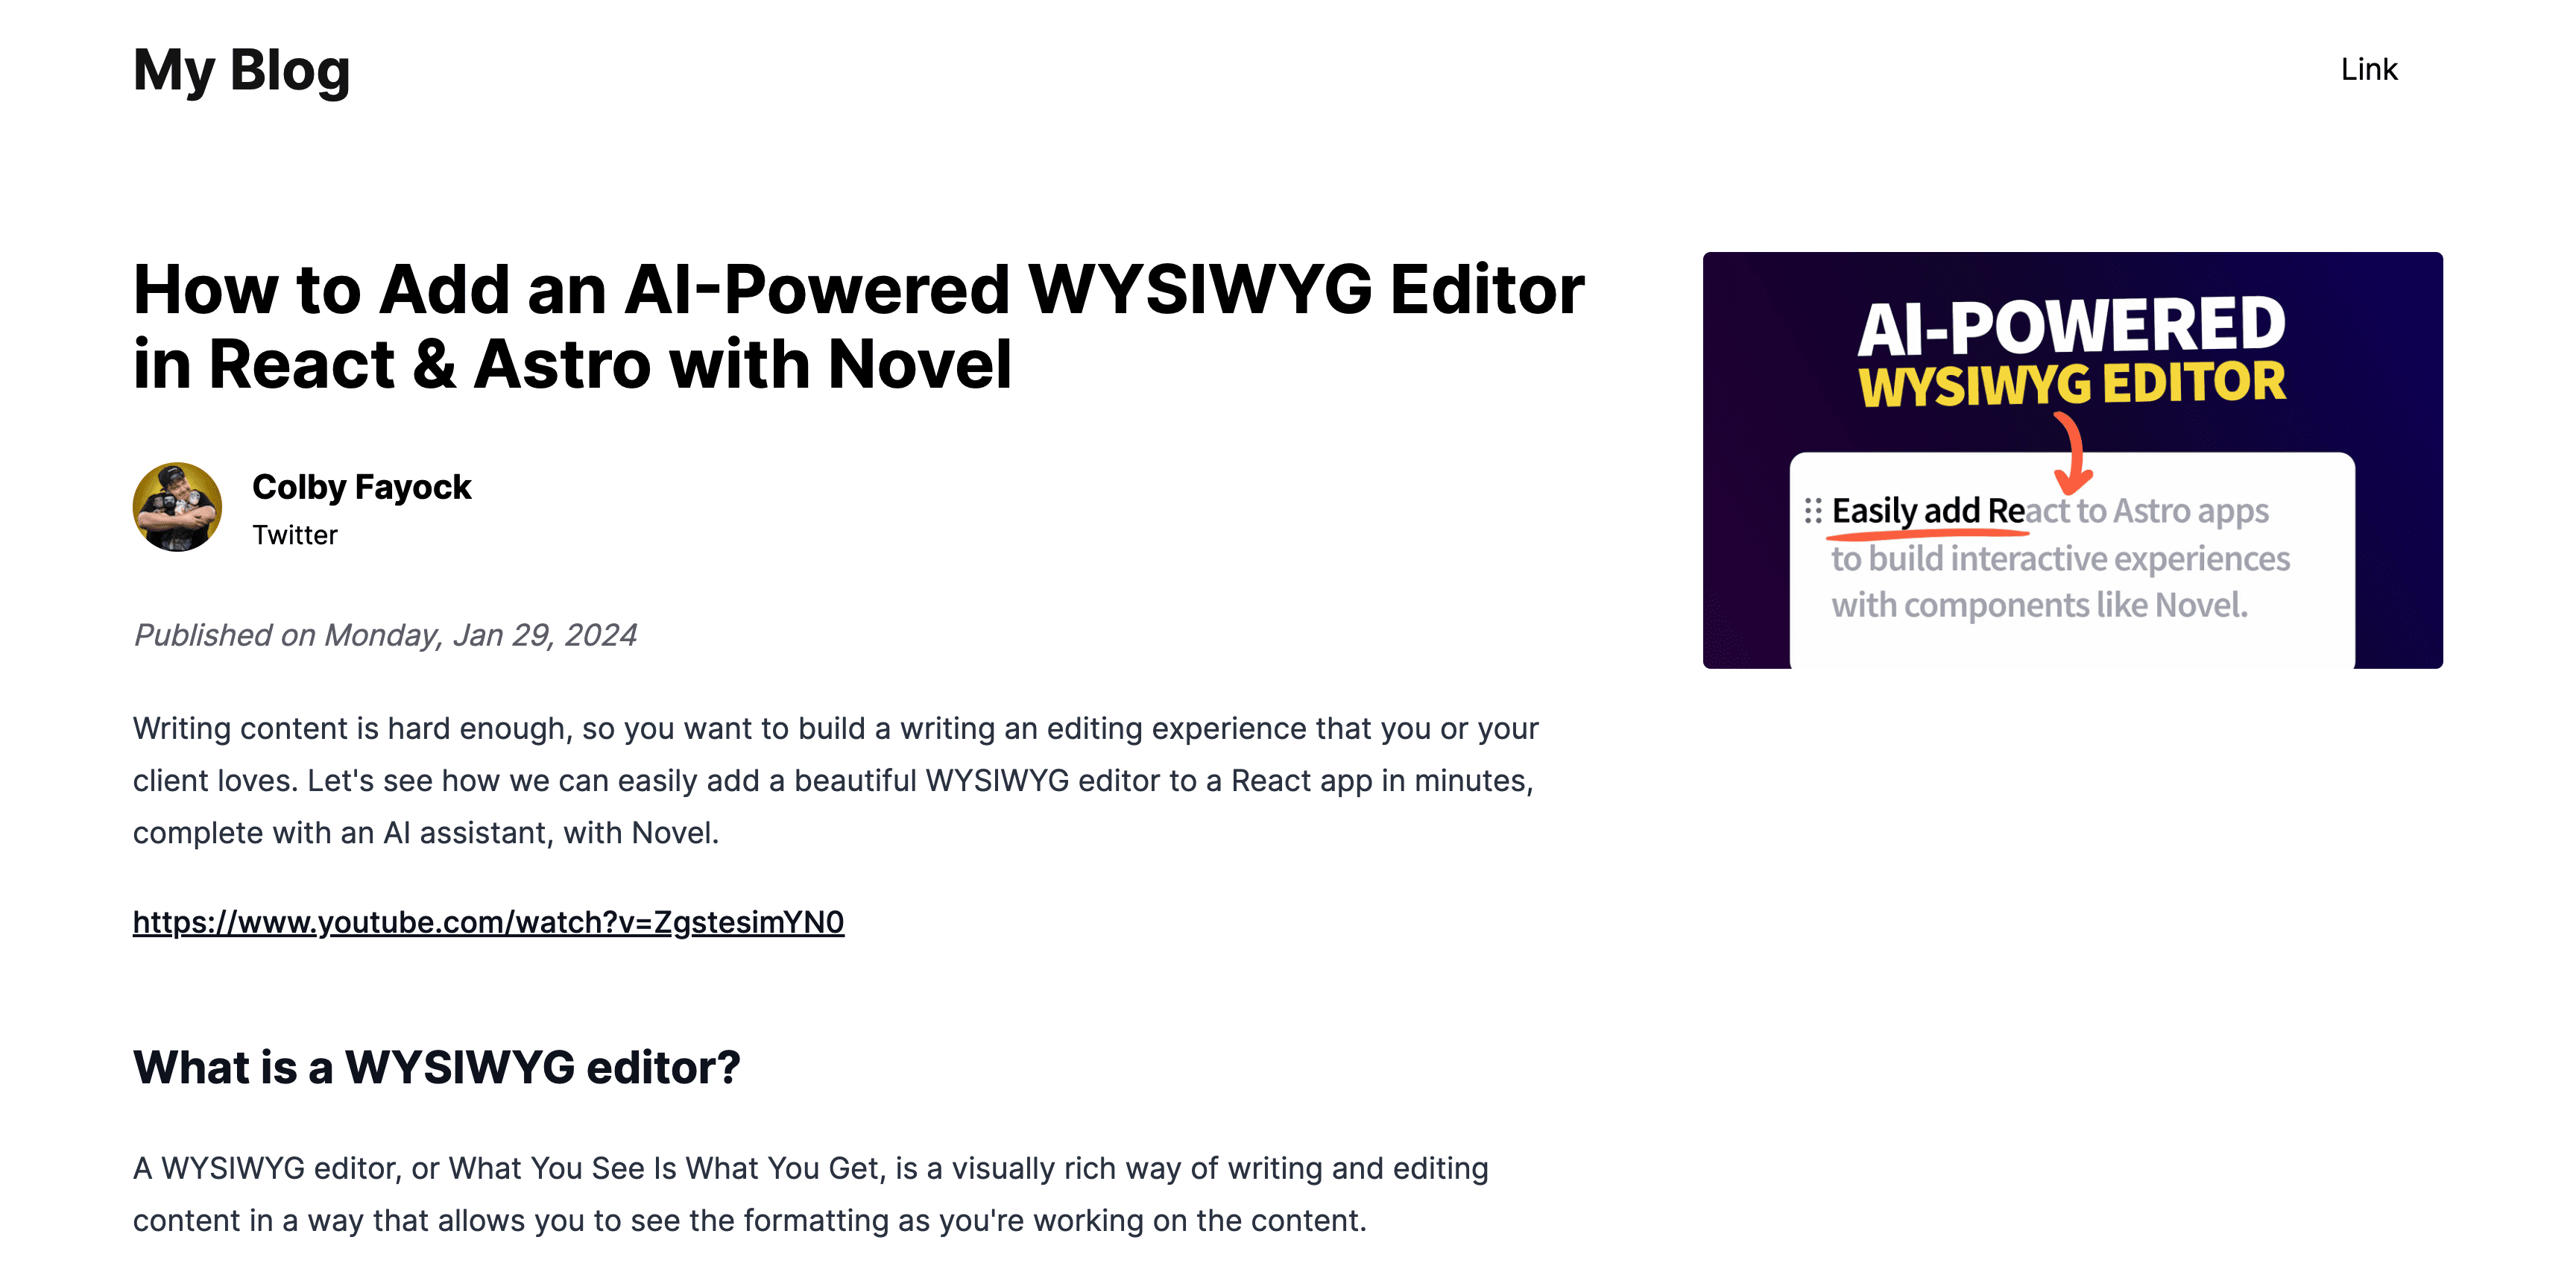
But with that we get our new post page!
Tip: If you want to see the Tailwind styles I'm using, you can check out the commit.
Before we wrap up this step however, we want to make sure we're linking our list of posts to each individual post.
Back on src/app/page.tsx, we can wrap our Image and h2 with a Next.js Link component pointing to our dynamic path:
First import the Link component:
import Link from 'next/link';
Then wrap the page elements, including the Image:
<Link href={`/posts/${post.slug}`}>
  <Image width="600" height="400" src={post.coverImage.url} alt="" />
</Link>
And the post title:
<h2>
  <Link href={`/posts/${post.slug}`}>{ post.title }</Link>
</h2>
And whenever you visit the homepage (or wherever you list your posts), you should be able to click through to your individual post page!
Next up, let's see how we can dynamically render a Hashnode Page.
Step 4: Dynamically Creating Hashnode Pages
This next step is going to look really similar to the past step, as we'll basically be doing the same thing in creating a dynamic page route and rendering content from an API query.
In our Hashnode dashboard, we're able to create new "static" Pages which basically allows us to put anything we want. It supports markdown to allow us to easily format our content.
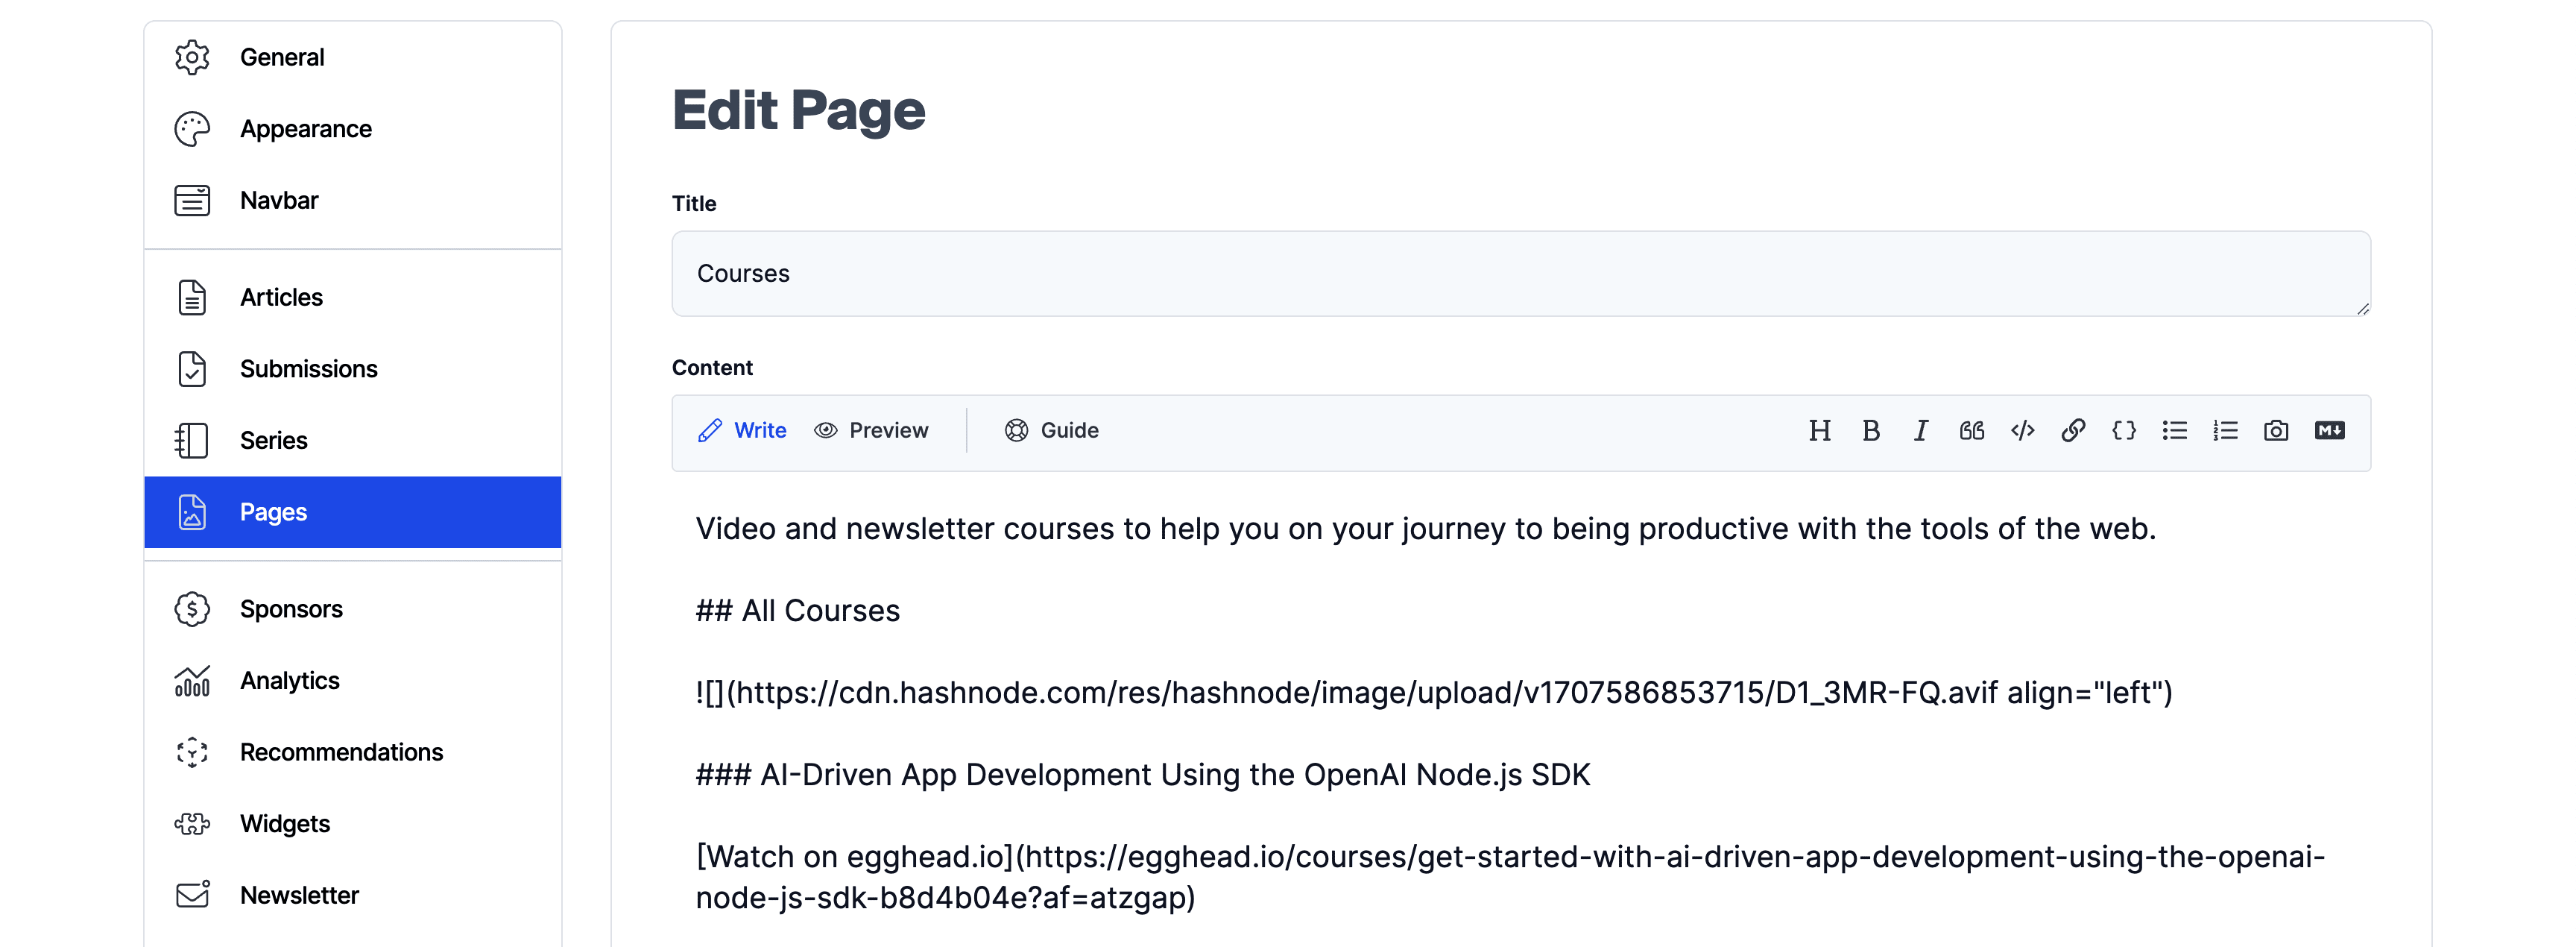
In order to get this page in our app, we can start off by creating our dynamic Next.js page path.
Inside of your app directory, create a new folder called [pageSlug] and inside create a file called page.tsx.
You'll notice that we're only create a folder 1-level deep, and that's optional, but intentional, as we'll want our pages to be available at the root of our website, such as if we want a Courses page, we want /courses not /pages/courses.
This can certainly create conflicts if you're not careful in how you create new pages and their slugs, but generally speaking, you'll just want to avoid a /posts page unless you're trying to create an index, at which point you'd probably want it to instead be dynamic.
But back to creating our dynamic page route, inside src/app/[pageSlug]/page.tsx add:
interface PageParams {
  params: { pageSlug: string };
}

export default async function Page({ params }: PageParams) {
  return (
    <article>
      <h1>Page</h1>
      <div>Content</div>
    </article>
  )
}
Like with our posts, here we're creating a template that receives a dynamic param, where in this case, it's pageSlug.
Next, let's import our query function to start querying our data:
import { query } from '@/lib/hashnode';
Then our query itself:
const { data: { publication } } = await query({
  query: `
    query($host: String!, $slug: String!) {
      publication(host: $host) {
        staticPage(slug: $slug) {
          content {
            html
          }
          id
          slug
          title
        }
      }
    }
  `,
  variables: {
    host: '<Your Hashnode Host (ex: site.hashnode.dev)>',
    slug: params.pageSlug
  }
});

interface Page {
  content: {
    html: string;
  }
  id: string;
  slug: string;
  title: string;
}

const page = publication?.staticPage as Page;
Tip: While we're not going to reuse the Page interface in this tutorial, feel free to try abstracting it like we did with the Post interface.
Here we're setting up our query where we dynamically query a "static page" by its slug. We then grab a few datapoints which will help us render the page.
We'll stick with a simpler implementation for static pages, so we can render that with the following:
<article>
  <h1>{ page.title }</h1>
  <div dangerouslySetInnerHTML={{
    __html: page?.content.html
  }} />
</article>
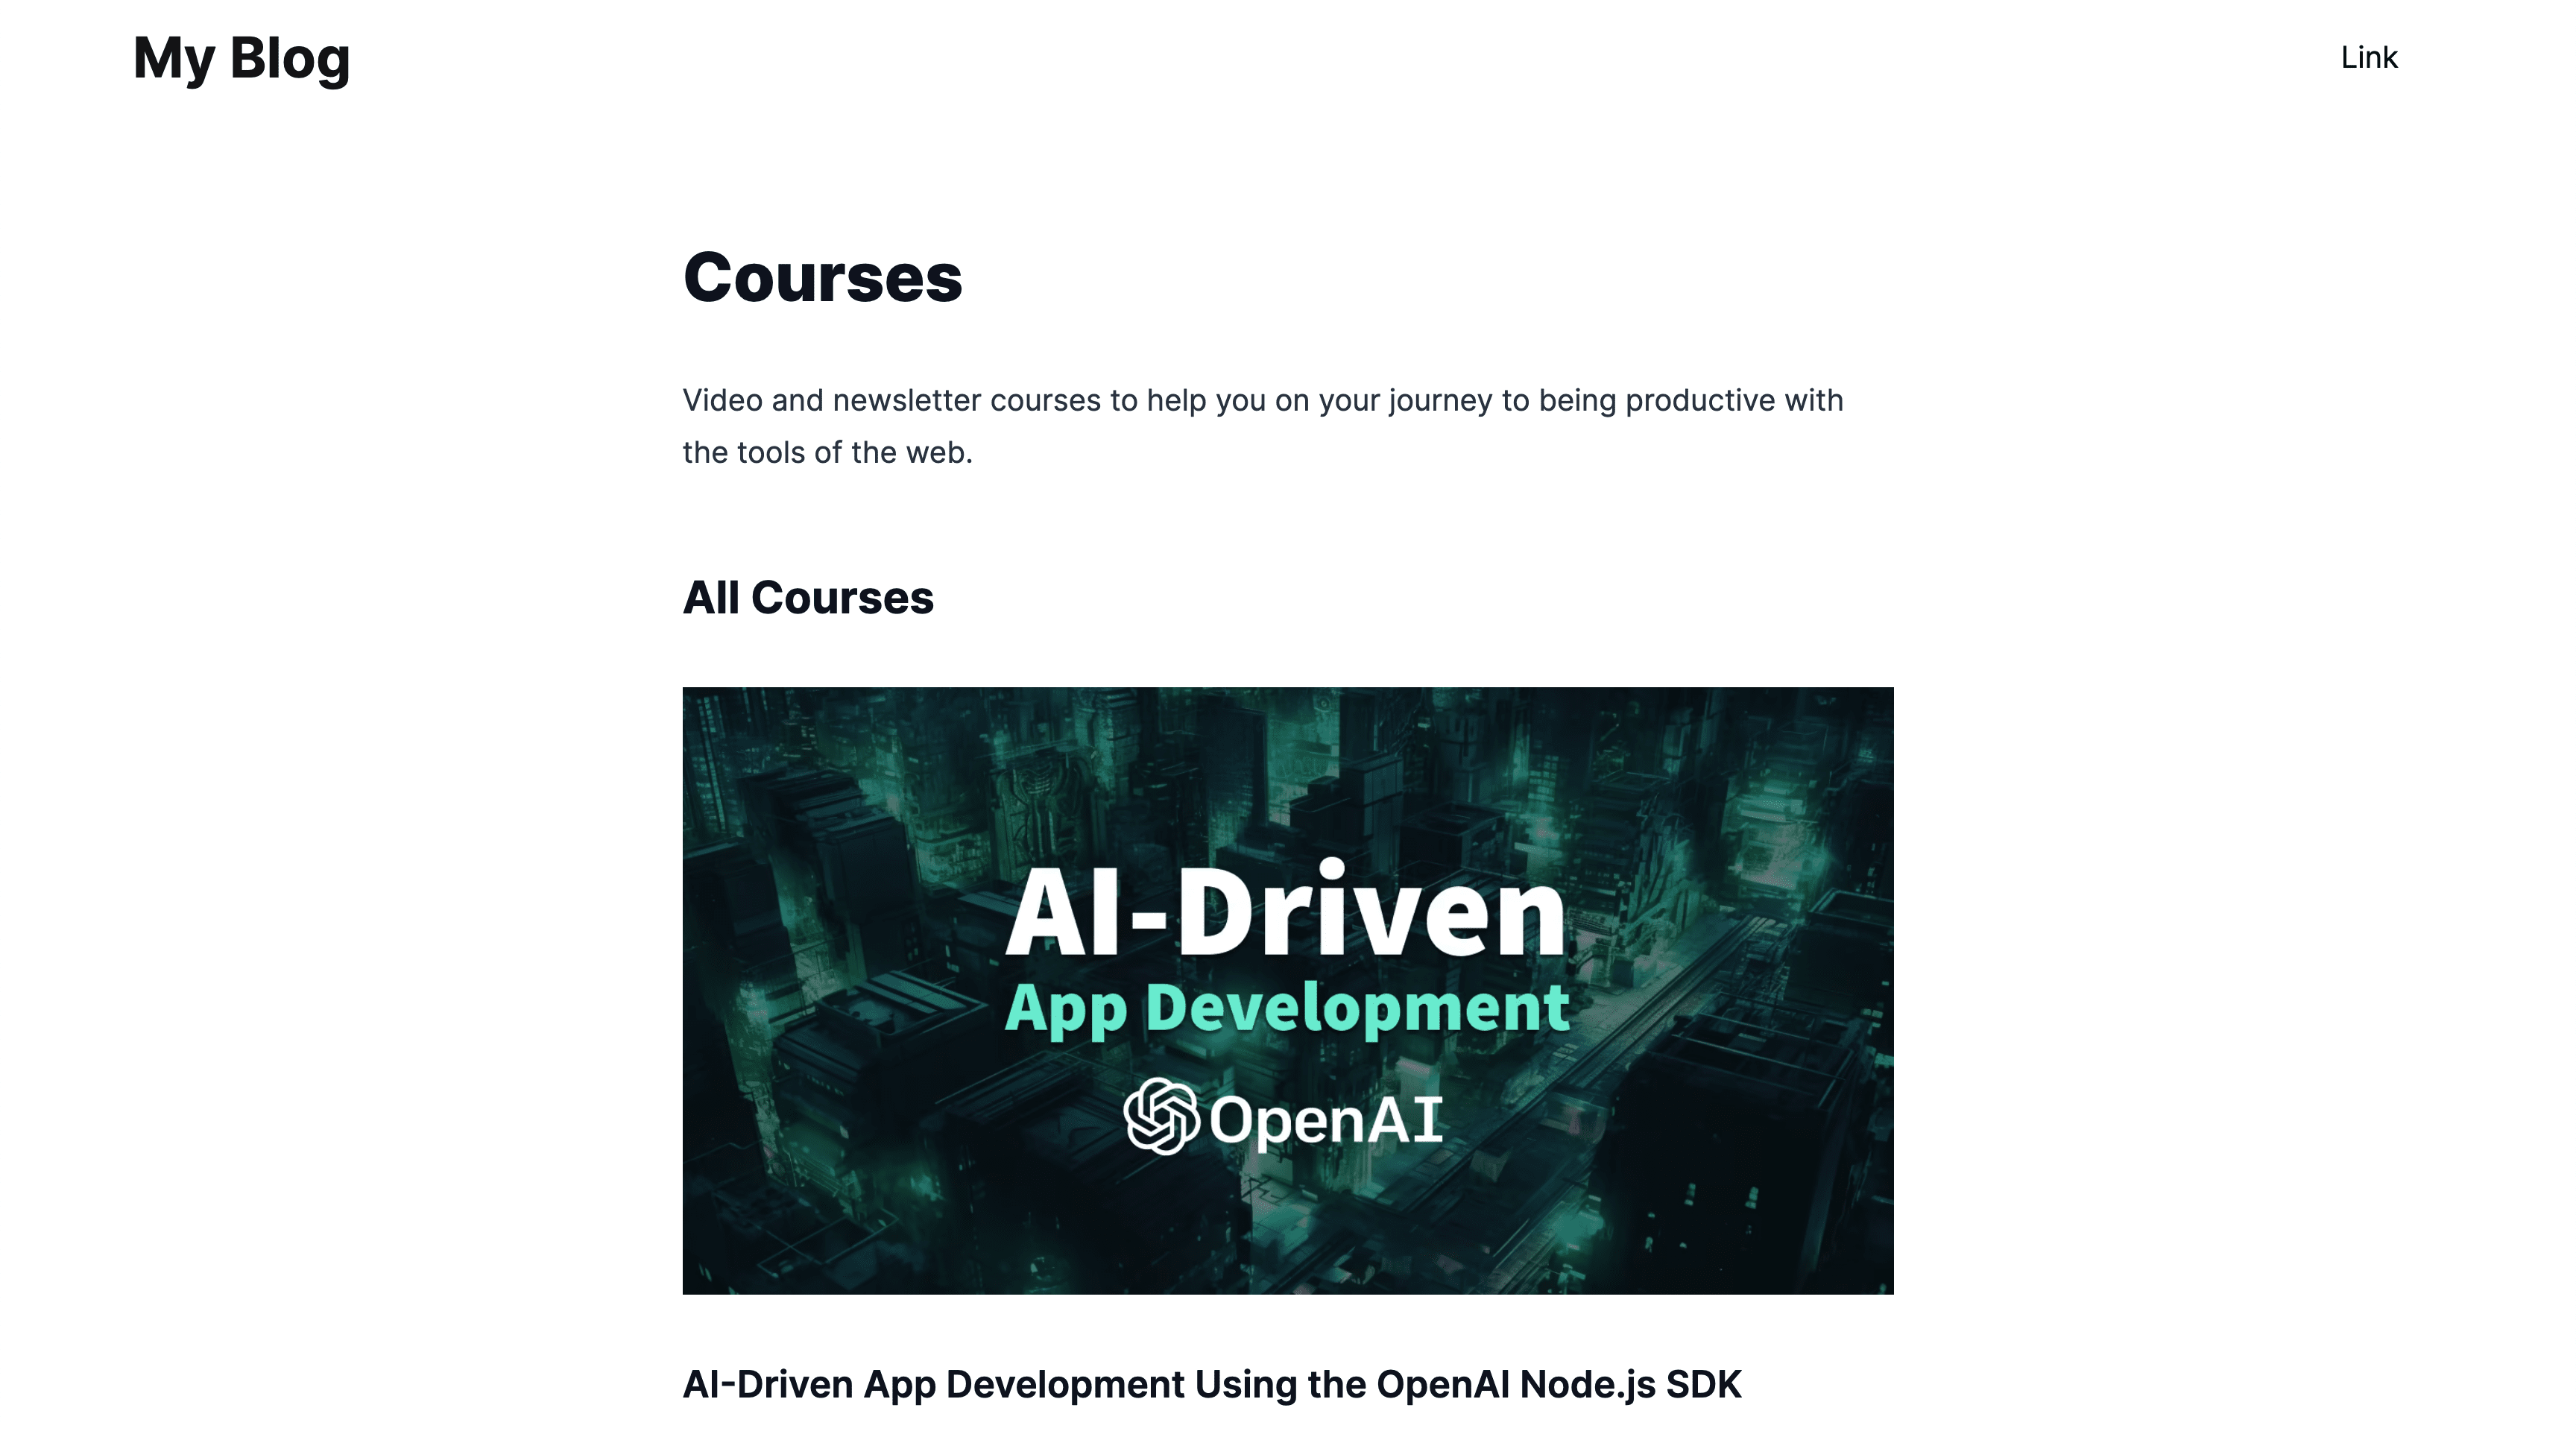
And for my example where I created a new Courses page, we can see that my content renders out in my app!
With that, we have our basic content set up between our blog posts and creating new pages, but we ultimately want to link these pages somewhere, so let's see how we can query for navigation and general site details.
Step 5: Adding Site Details & Links to the Navigation
Given we're building a custom website, we have the ability to really add whatever we want into our app, navigation, site name, and all those details included, but part of the beauty of using a CMS is being able to dynamically manage those things without having to make code changes each time.
Take the Navigation for instance, if I want to create a new page then swap it into the nav, I don't want to have to push code, I want to do that right inside of Hashnode.
To solve this, we can query details about our publication including the publication name as well as navigation information which we can manage right inside of our dashboard. Let's start by dynamically getting the title for our site to display in our navigation.
The Publication Name is configured in your Hashnode dashboard, which is the value we'll use.
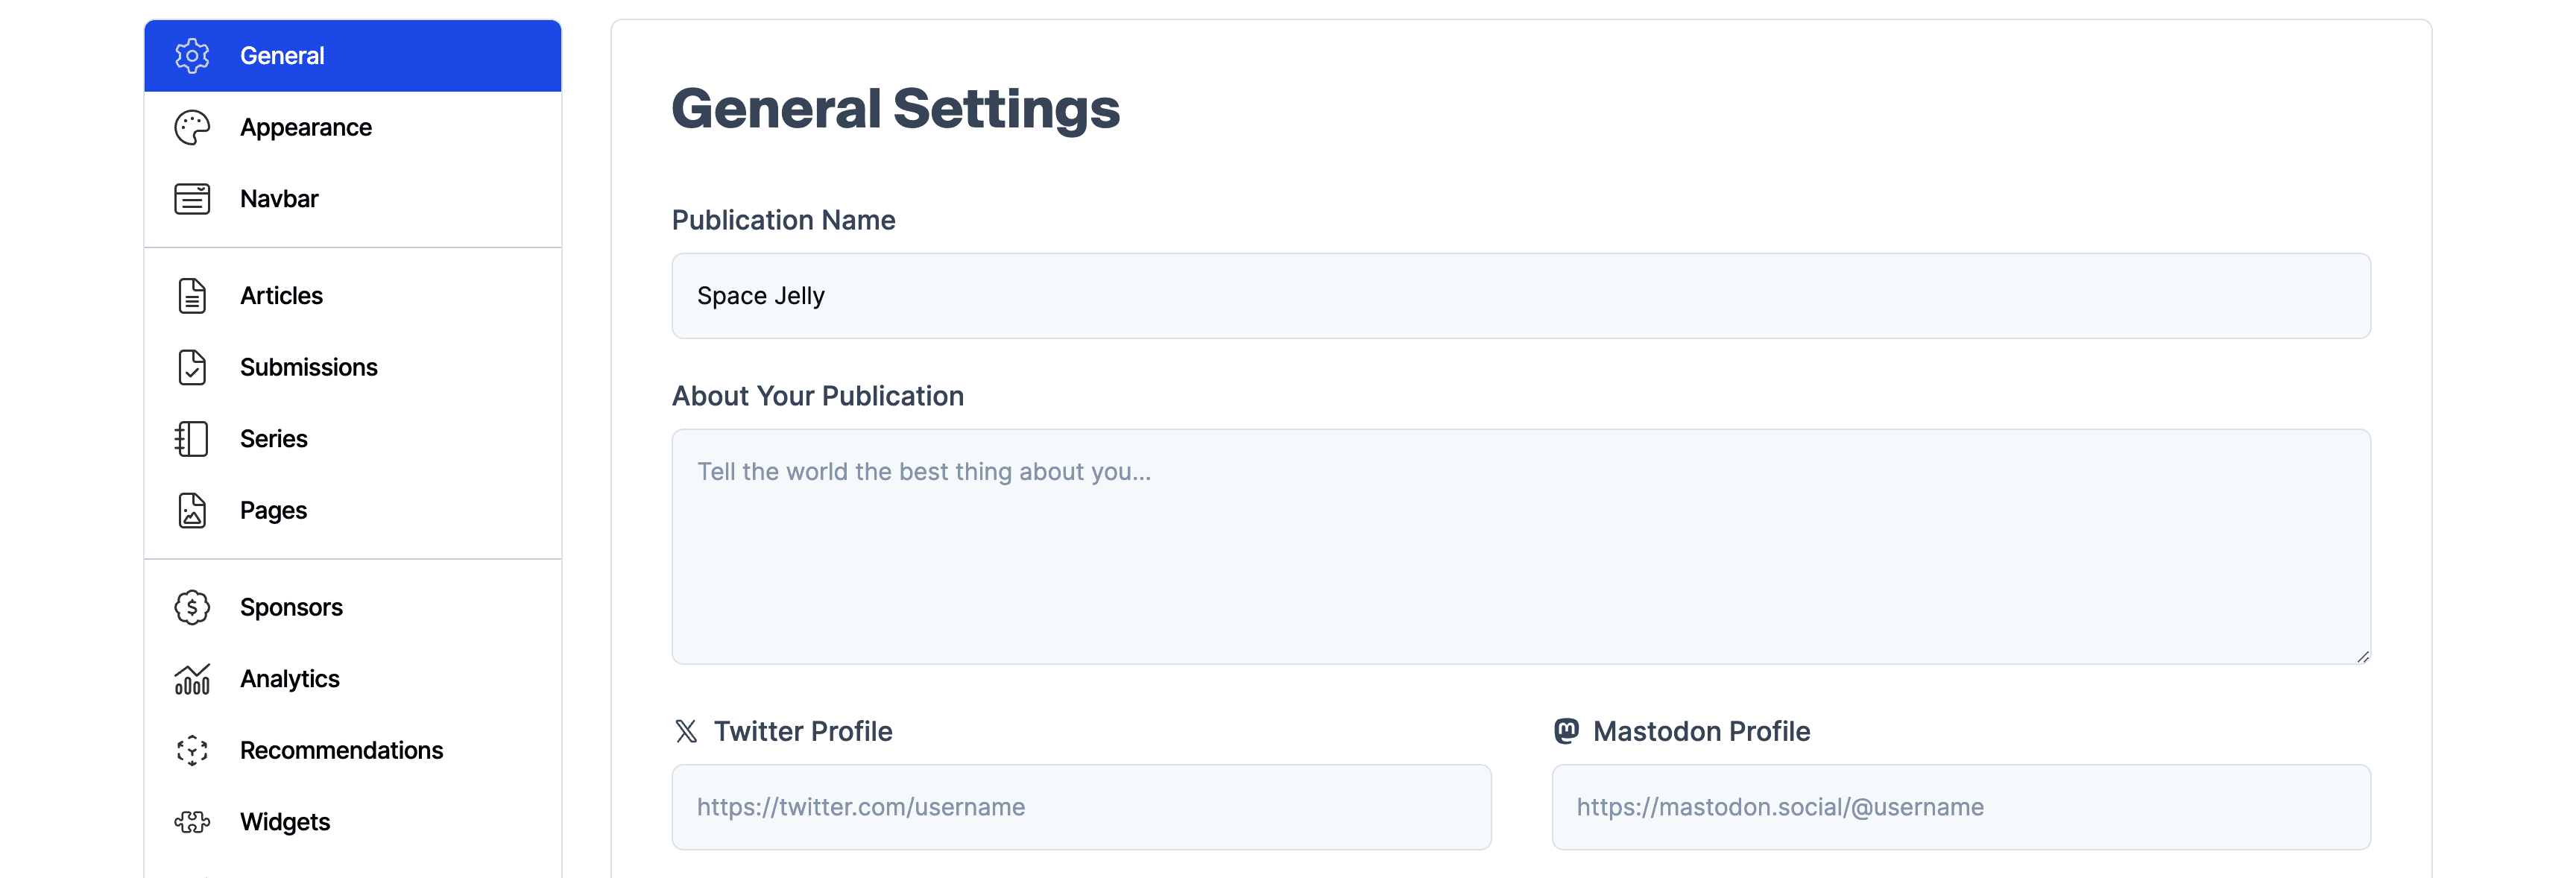
I'll be working from within a component called Nav that's placed inside my Next.js Layout file at src/app/layout.tsx. This is a common pattern, but you can follow along wherever you'd like, even adding it directly in the Layout file.
A basic starting point could look like:
import Link from 'next/link';

export default async function Nav() {
  return (
    <nav>
      <p>
        <Link href="/">
          My Blog
        </Link>
      </p>
      <ul className="flex m-0">
        <li className="mr-6">
          Link
        </li>
      </ul>
    </nav>
  )
}
As usual, let's first start off by importing out query function. Inside of the file you're adding your Nav or src/components/Nav/Nav.tsx add:
import { query } from '@/lib/hashnode';
Then for the query, add the following:
const { data } = await query({
  query: `
    query($host: String) {
      publication(host: $host) {
        title
      }
    }
  `,
  variables: {
    host: '<Your Hashnode Host (ex: site.hashnode.dev)>',
  }
});

interface Publication {
  title?: string;
}

const publication: Publication = data?.publication;
Here we're querying the title directly on the publication. We also set up a new type for our Publication data and ultimately store it in a new constant.
Tip: You can abstract this function and make the same request in your Footer component. When Next.js renders the page, it will deduplicate the requests!
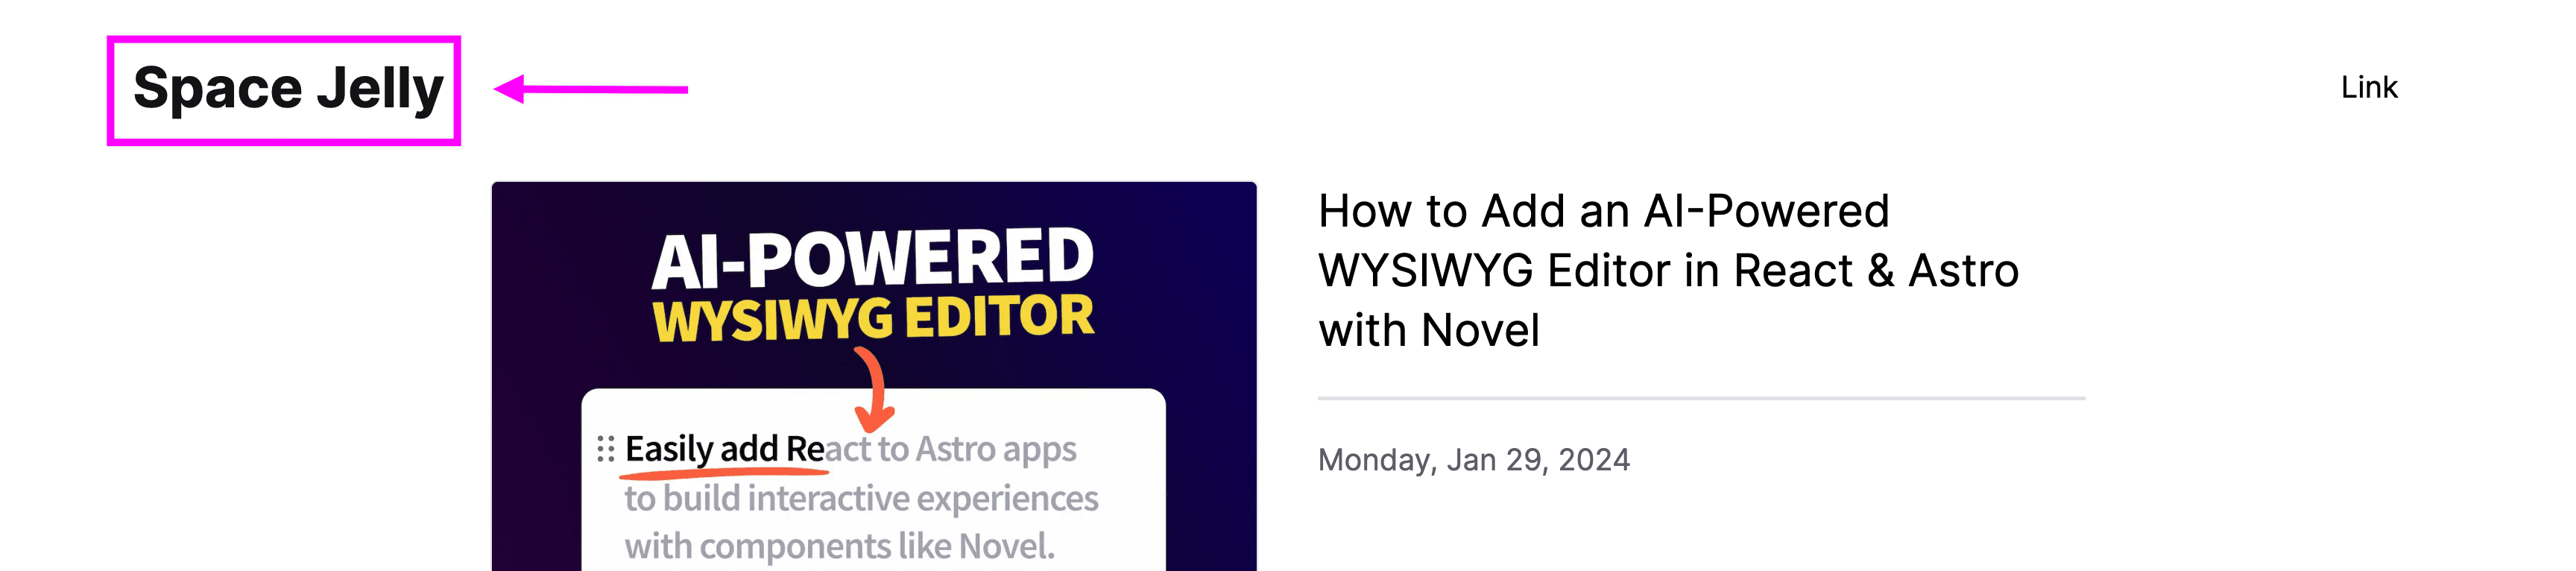
Once we have that, we can access our title on our publication and update our Nav:
<p>
  <Link href="/">
    { publication.title }
  </Link>
</p>
And if we try to look back at our page, we should see our Hashnode's publication name!
That worked perfectly, so let's apply the same thing to the Navigation.
Now the Navigation looks a little different, there's a specific section that allows us to add links and manage what's inside our Navigation.
If we head to our Navbar settings, we can see we have an option to add an item which would consist of either a Page or a Link. That means we can either link directly to a native Hashnode Page or we can link to simply whatever we want.
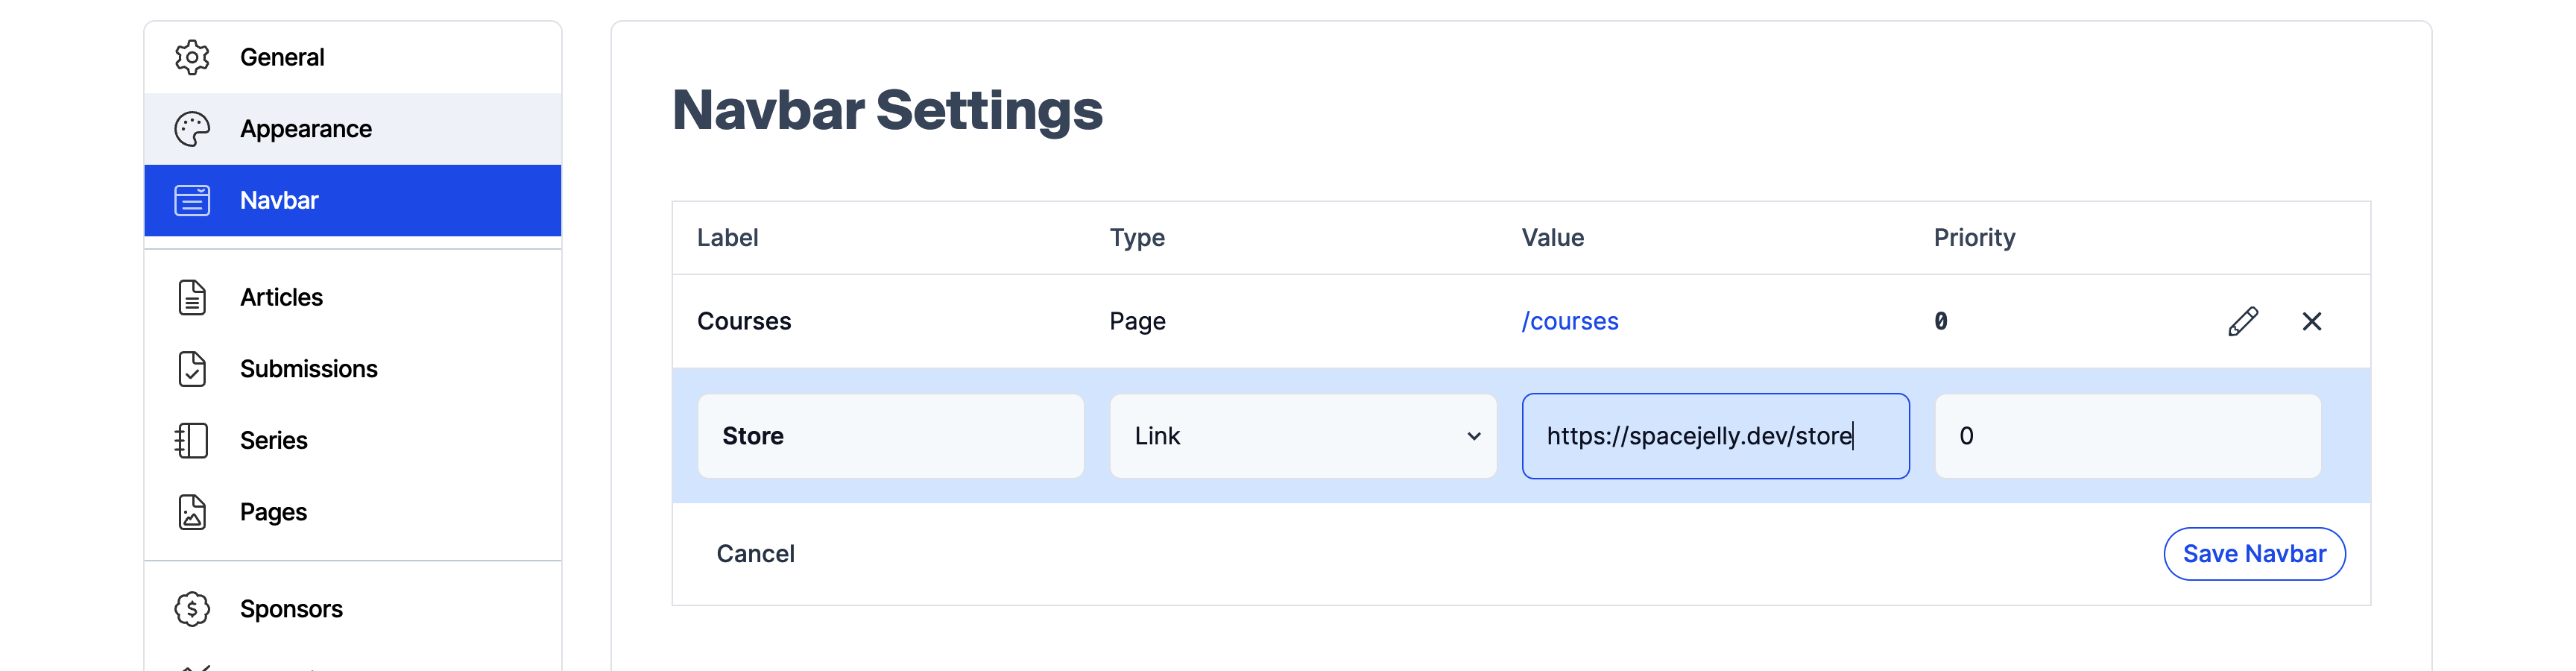
So in the above, if I wanted to link to my Courses Page but go offsite for my Store (which in this instance would eventually be the same place), I could set that up easily.
Now for querying them, we will add this right alongside our title but this time query our Navbar items.
Let's first update our existing query to include these items, which will be located under preferences:
const { data } = await query({
  query: `
    query($host: String) {
      publication(host: $host) {
        title
        preferences {
          navbarItems {
            label
            url
          }
        }
      }
    }
  `,
  variables: {
    host: '<Your Hashnode Host (ex: site.hashnode.dev)>',
  }
});
We also need to update our Publication type to reflect this:
interface Publication {
  title?: string;
  preferences?: {
    navbarItems?: Array<{
      label?: string;
      url?: string;
    }>
  }
}
But now, we can access our navbarItems and loop through them to create our links:
<ul>
  {publication.preferences?.navbarItems?.map((item) => {
    return (
      <li key={item.id}>
        <Link href={item.url}>{ item.label }</Link>
      </li>
    )
  })}
</ul>
Where if we now look back at our app, we should see our updated links!
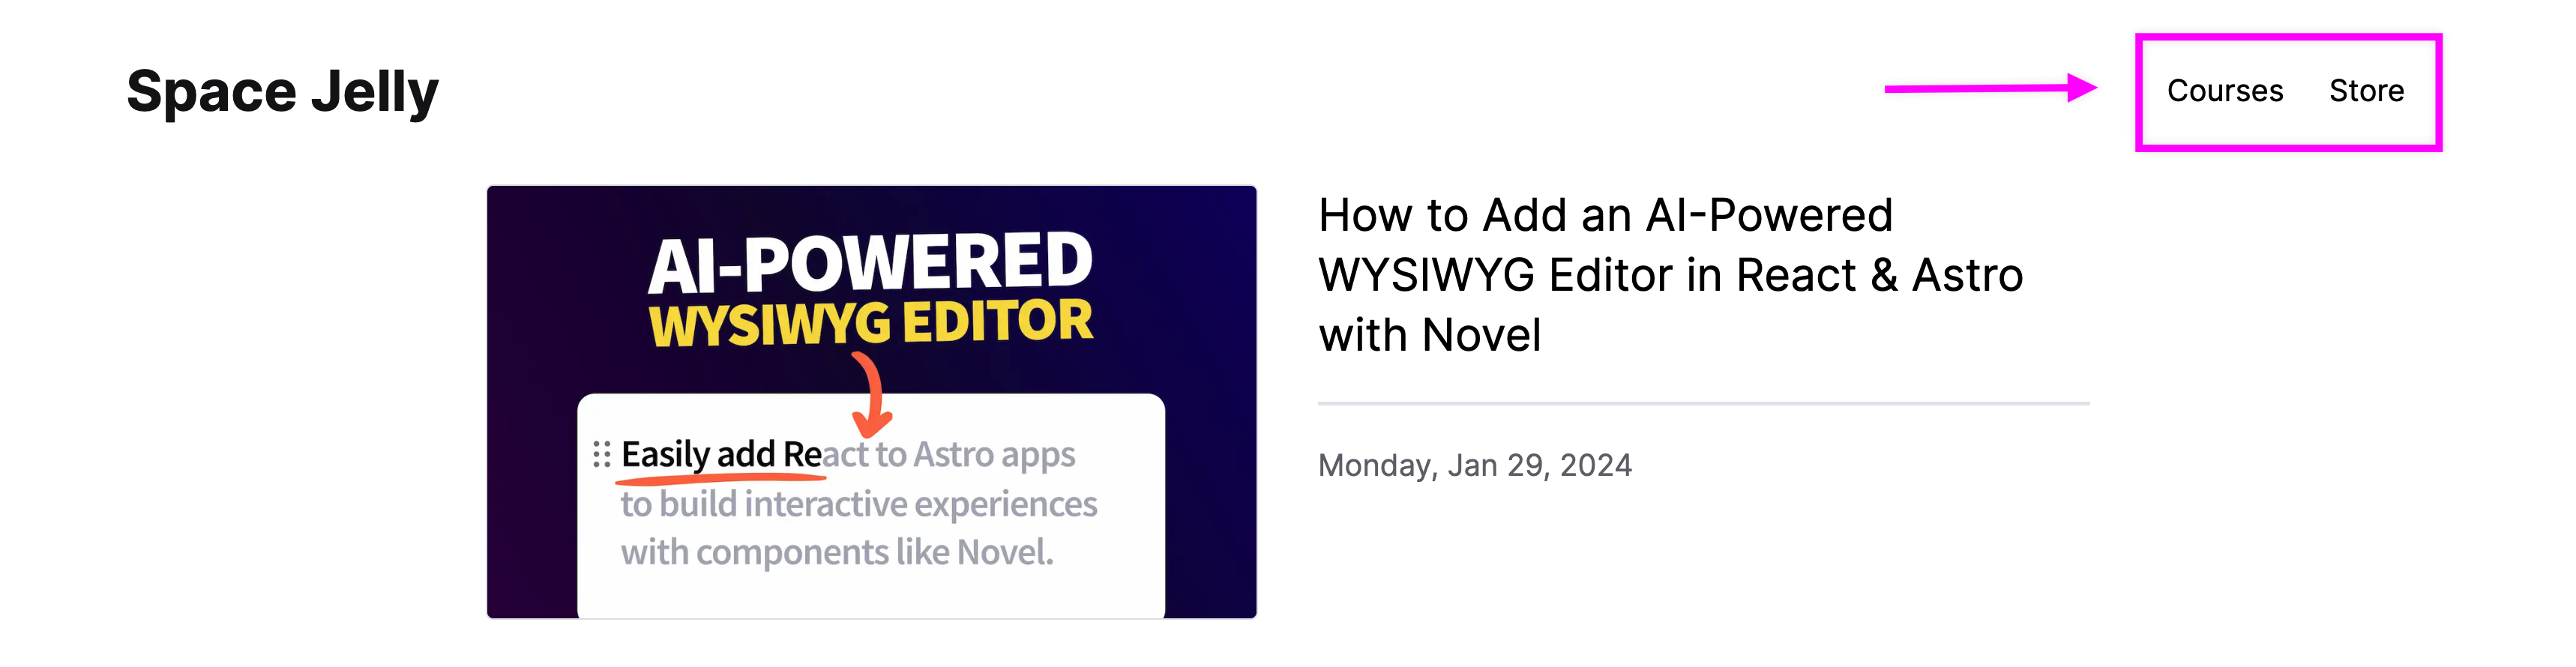
Now one thing you might notice though, is if you hover over or click the link of any of the links, you'll notice that they're all full URLs whether they're a Page or a Link.
While this makes sense for a Link, as its intended to be external, that creates problems for Pages, as we lose our ability to handle navigation clientside with Next.js.
What we can do is simply stripe the URL of our hostname leaving just a path, so that our clientside navigation kicks in, and we can then be navigated to our local path:
<ul>
  {publication.preferences?.navbarItems?.map((item) => {
    return (
      <li key={item.id}>
        <Link href={item.url.replace(`https://<Your Hashnode Host (ex: site.hashnode.dev)>`, '')}>{ item.label }</Link>
      </li>
    )
  })}
</ul>
And with that, we should see our link update.
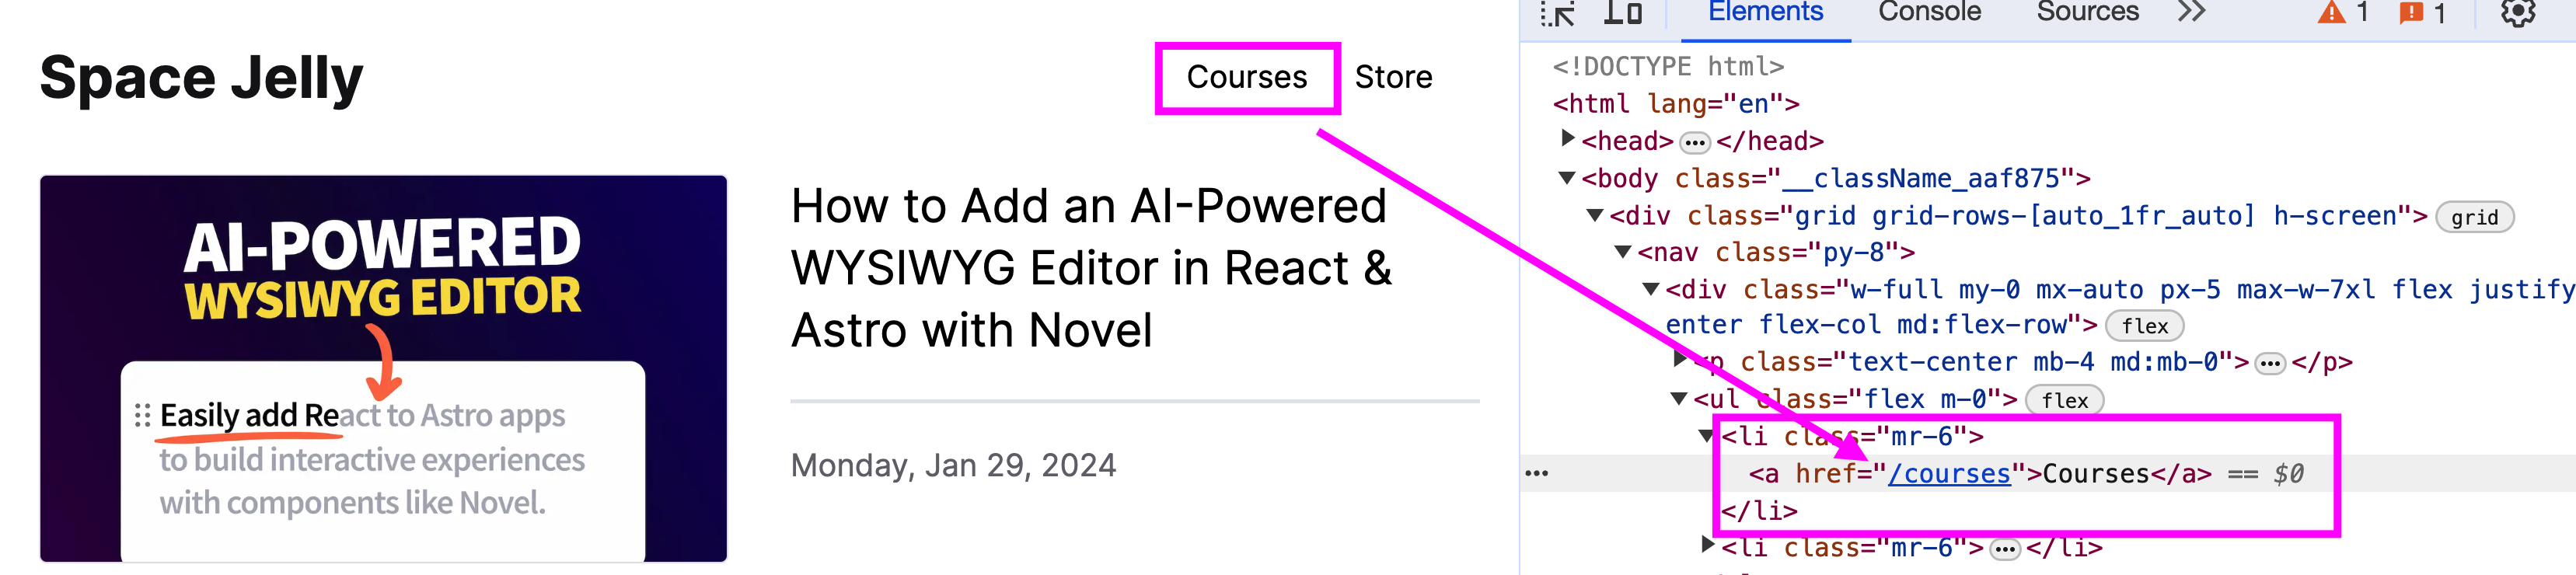
If we click that link, it takes us to our dynamically generated page, which is exactly what we want.
Tip: If you noticed, this uses the same value that we use in our queries and each of our queries use the same value as well. Since this is also a potentially changeable value, you could store this in an environment variable and reference it once time in your configuration!
Step 6: Configuring SEO Metadata
An important aspect of building and publishing a blog is getting the SEO right. Without proper titles and descriptions, your page could be lost in a sea of articles from around the world, not having a chance of getting clicks from Google searches.
Next.js comes with SEO metadata management out of the box, so we'll be able to dynamically create our titles and descriptions to help searchers get to the right place.
If we look inside the Next.js root Layout file at src/app/layout.tsx, as long as you didn't remove it or change it, you'll likely see a const or function that's named metadata or generateMetadata with some values aready populated.
There are two separate ways to manage our metadata, where once is static in nature and the other dynamic. Since we want to pull our metadata in from our Publication, we want to go the function route.
To start, we need to query our Publication data from within the generateMetadata function.
First import our query function:
import { query } from '@/lib/hashnode';
Then inside of the generateMetadata function of src/app/layout.tsx add:
const { data } = await query({
  query: `
    query($host: String) {
      publication(host: $host) {
        descriptionSEO
        title
      }
    }
  `,
  variables: {
    host: '<Your Hashnode Host (ex: site.hashnode.dev)>',
  }
});

interface Publication {
  descriptionSEO?: string;
  title?: string;
}

const publication: Publication = data?.publication;
Here we're using a similar query to our previous step only this time, we just need our title and description.
Tip: You likely want to abstract this query into a function, combine the queries, and use the same function between both your Layout and your Nav, but I'm showing it separate for the sake of example. Given Next.js deduplicates the requests, having 1 single request with a little more information will be more performant than 2 requests with almost the same information, but be sure to test this in your own application!
With those values, we can now return them in our metadata object:
return {
  title: publication.title,
  description: publication.descriptionSEO,
}
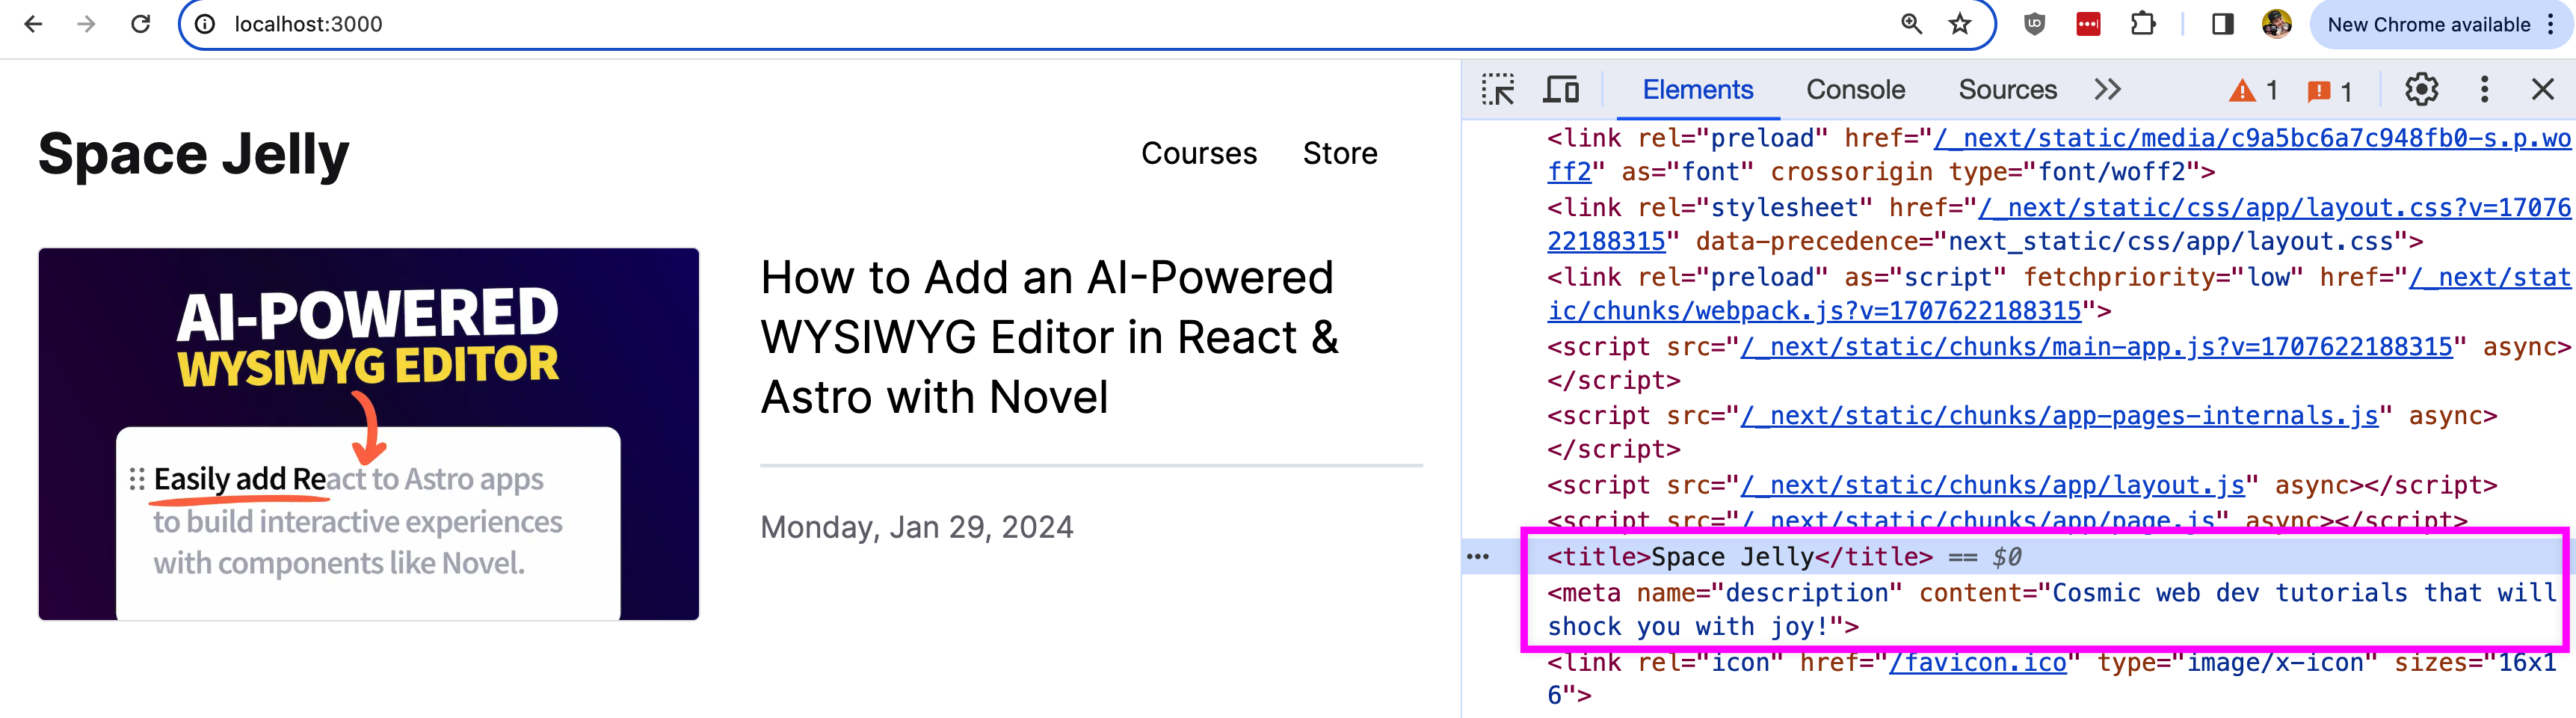
Once we head back to our browser, we won't be able to tell anything by just looking at the page, but if we inspect the HTML, we can see our title and description tags with our dynamic values.
Now, we can do the same thing for our Posts and Pages, where for each, we'll need to create our new generateMetadata function in each page file and make a query for our dynamic data.
Inside src/app/posts/[postSlug]/page.tsx add:
export async function generateMetadata({ params }: PostParams): Promise<Metadata> {
  const { data: { publication } } = await query({
    query: `
      query($host: String!, $slug: String!) {
        publication(host: $host) {
          post(slug: $slug) {
            seo {
              description
            }
            title
          }
        }
      }
    `,
    variables: {
      host: process.env.HASHNODE_HOST,
      slug: params.postSlug
    }
  });

  const post = publication?.post as Post;

  return {
    title: `${post.title} - <Your Blog Name>`,
    description: post.seo?.description || `Read ${post.title} on <Your Blog Name>`
  }
}
Notice that we're setting up an argument that reflects PostParams, similar to the params that get passed into the Post page itself. We're also adding an seo object to our query, where if inside your Post, you've defined an SEO description, we can use that, otherwise fallback to something generic (not recommended).
Tip: Similar to the Publication request, now that we're querying for similar Post data in multiple locations, it may be good to abstract this into a function.
And inside of our src/app/[pageSlug]/page.tsx file, we'll do the same thing, but only now for our Pages:
export async function generateMetadata({ params }: PageParams): Promise<Metadata> {
  const { data: { publication } } = await query({
    query: `
      query($host: String!, $slug: String!) {
        publication(host: $host) {
          staticPage(slug: $slug) {
            seo {
              description
            }
            title
          }
        }
      }
    `,
    variables: {
      host: process.env.HASHNODE_HOST,
      slug: params.pageSlug
    }
  });

  const page = publication?.staticPage as Page;

  return {
    title: `${page.title} - <Your Blog Name>`,
    description: page.seo?.description || `${page.title} on Space Jelly`
  }
}
Tip: Similar to the Post metadata generation, this make sense to abstract out into a single function for making Post queries.
In both files, if using Typescript, be sure to import the Metadata type that's referenced above:
import type { Metadata } from 'next'
And with that, your titles and descriptions should be filled out for your dynamic pages!
Be sure to have unique values in your SEO descriptions for all posts and pages to make it the most effective.
Tip: You can also take this further and take advantage of other SEO options like Open Graph images so that when your pages are shared on social media, a nice big image will display!
Last Step: Turning on Headless Mode
The final step is a quick one, but likely the most important one.
We need to turn on Headless mode!
You need to make sure you do this once your website is published, otherwise you'll risk duplicate content issues between both Hashnode and your website containing the same exact post.
With this mode enabled, Hashnode will not generate any UI at all. This is an important distinction as it helps prevent any SEO impact on publishing your Hashnode content on your own site.
Instead, because one of the large benefits here is being able to embrace Hashnode's network, Hashnode will do the work for us utilizing links that go directly to your published website in locations such as the Hashnode feed and wherever else they promote your content.
To do this you can head to the Advanced section of your Hashnode blog dashboard where you'll find the Enable Headless Mode option.
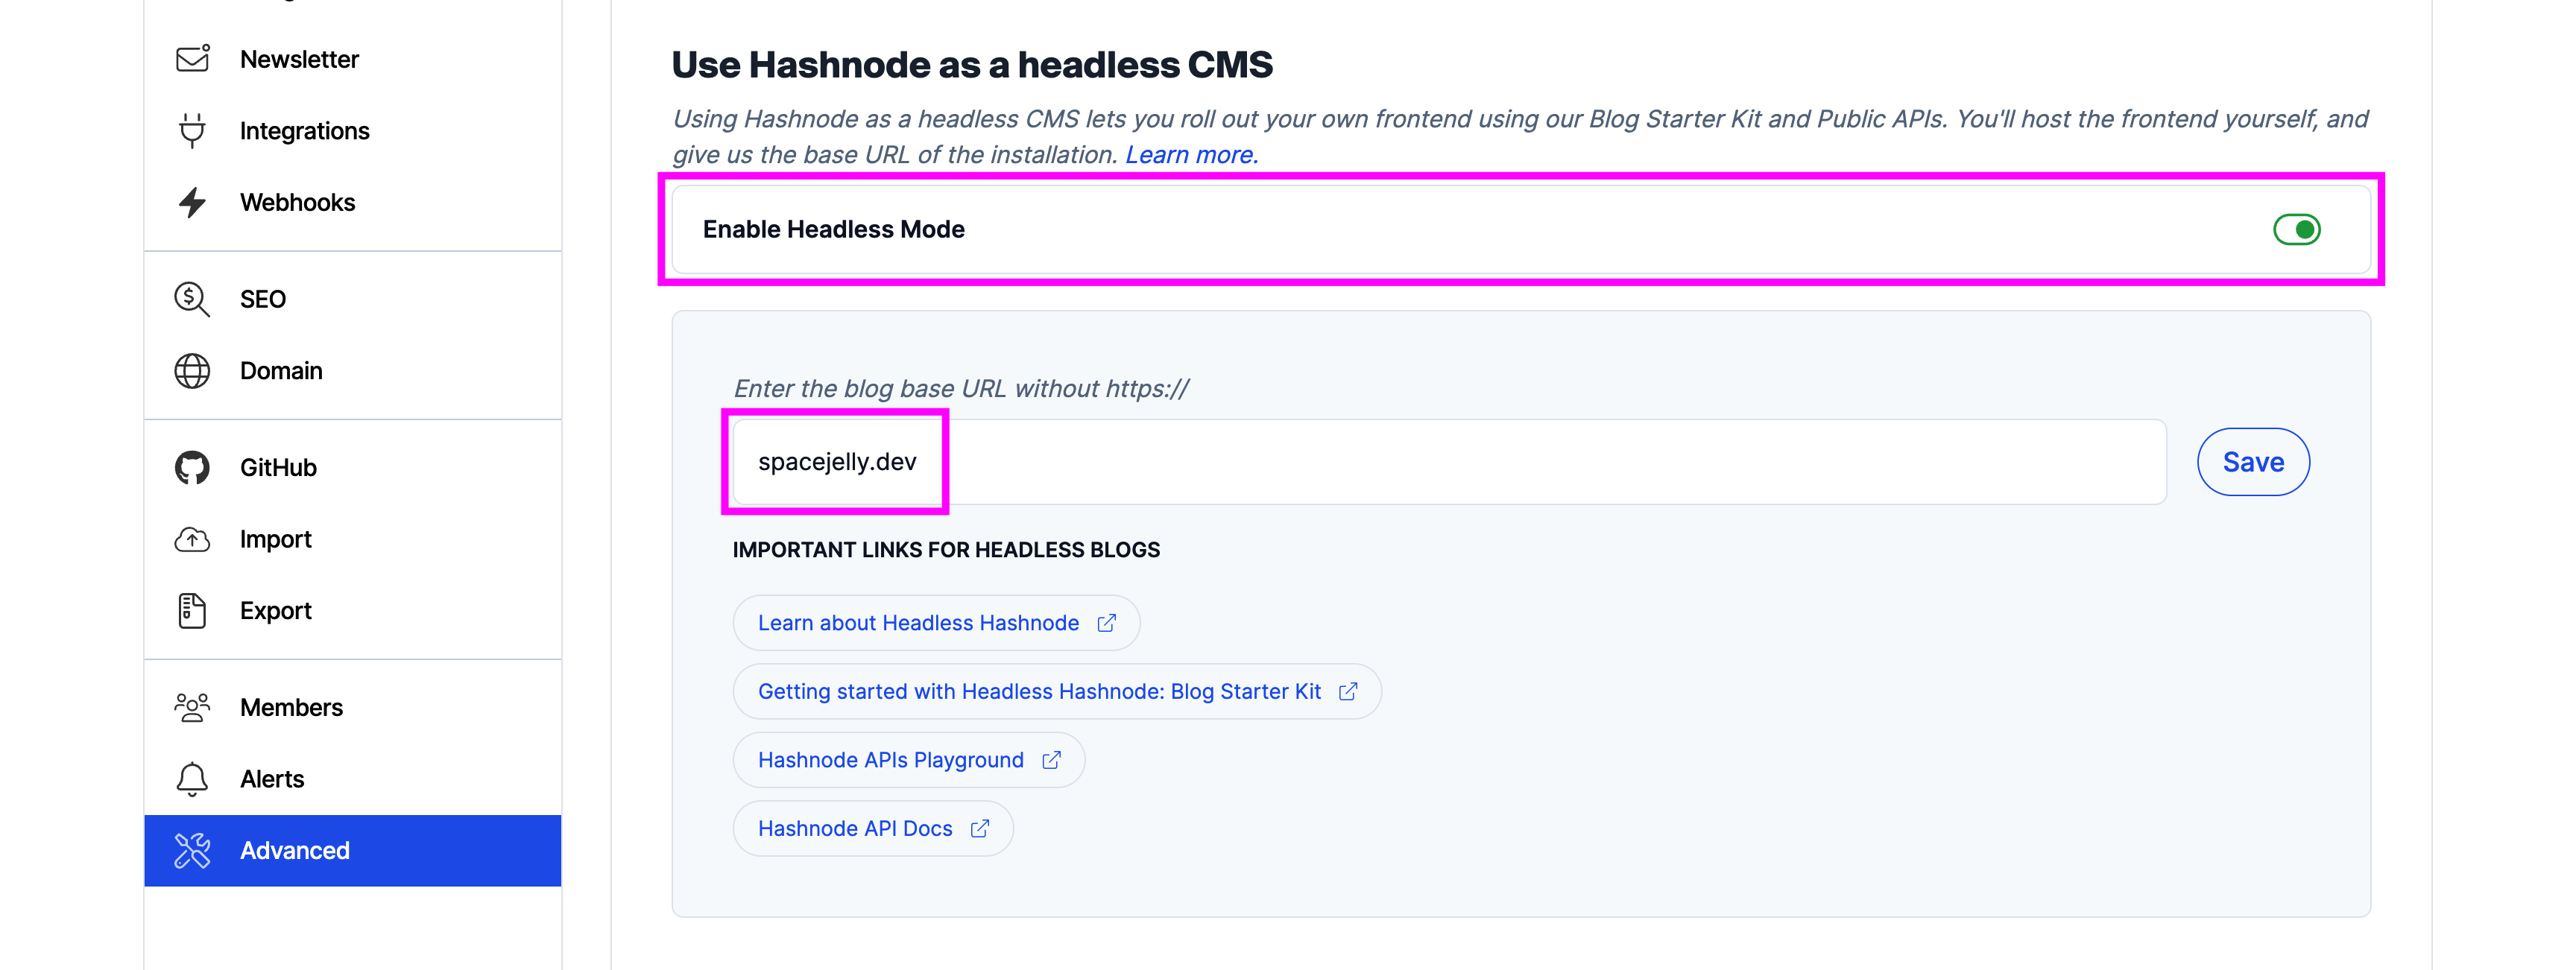
You'll need to enter the base URL of where your custom website is published so Hashnode knows where to direct people.
But once done, you're now set up and ready to go with your new custom blog with Hashnode!
What else can you do?
Spend time customizing your Hashnode site
Hashnode includes a lot of customization options with the ability to pull them into your site. The benefit here is that you don't have to push code changes with every tweak, instead, you can customize straight from within your Hashnode dashboard.
Add a Newsletter signup
One of the great features of Hashnode is it comes with a Newsletter capability but to use that, you need people to sign up first.
The Hashnode GraphQL API includes the ability to both query for information about the newsletter as well as pass along mutations so that you can sign people up from within your app.
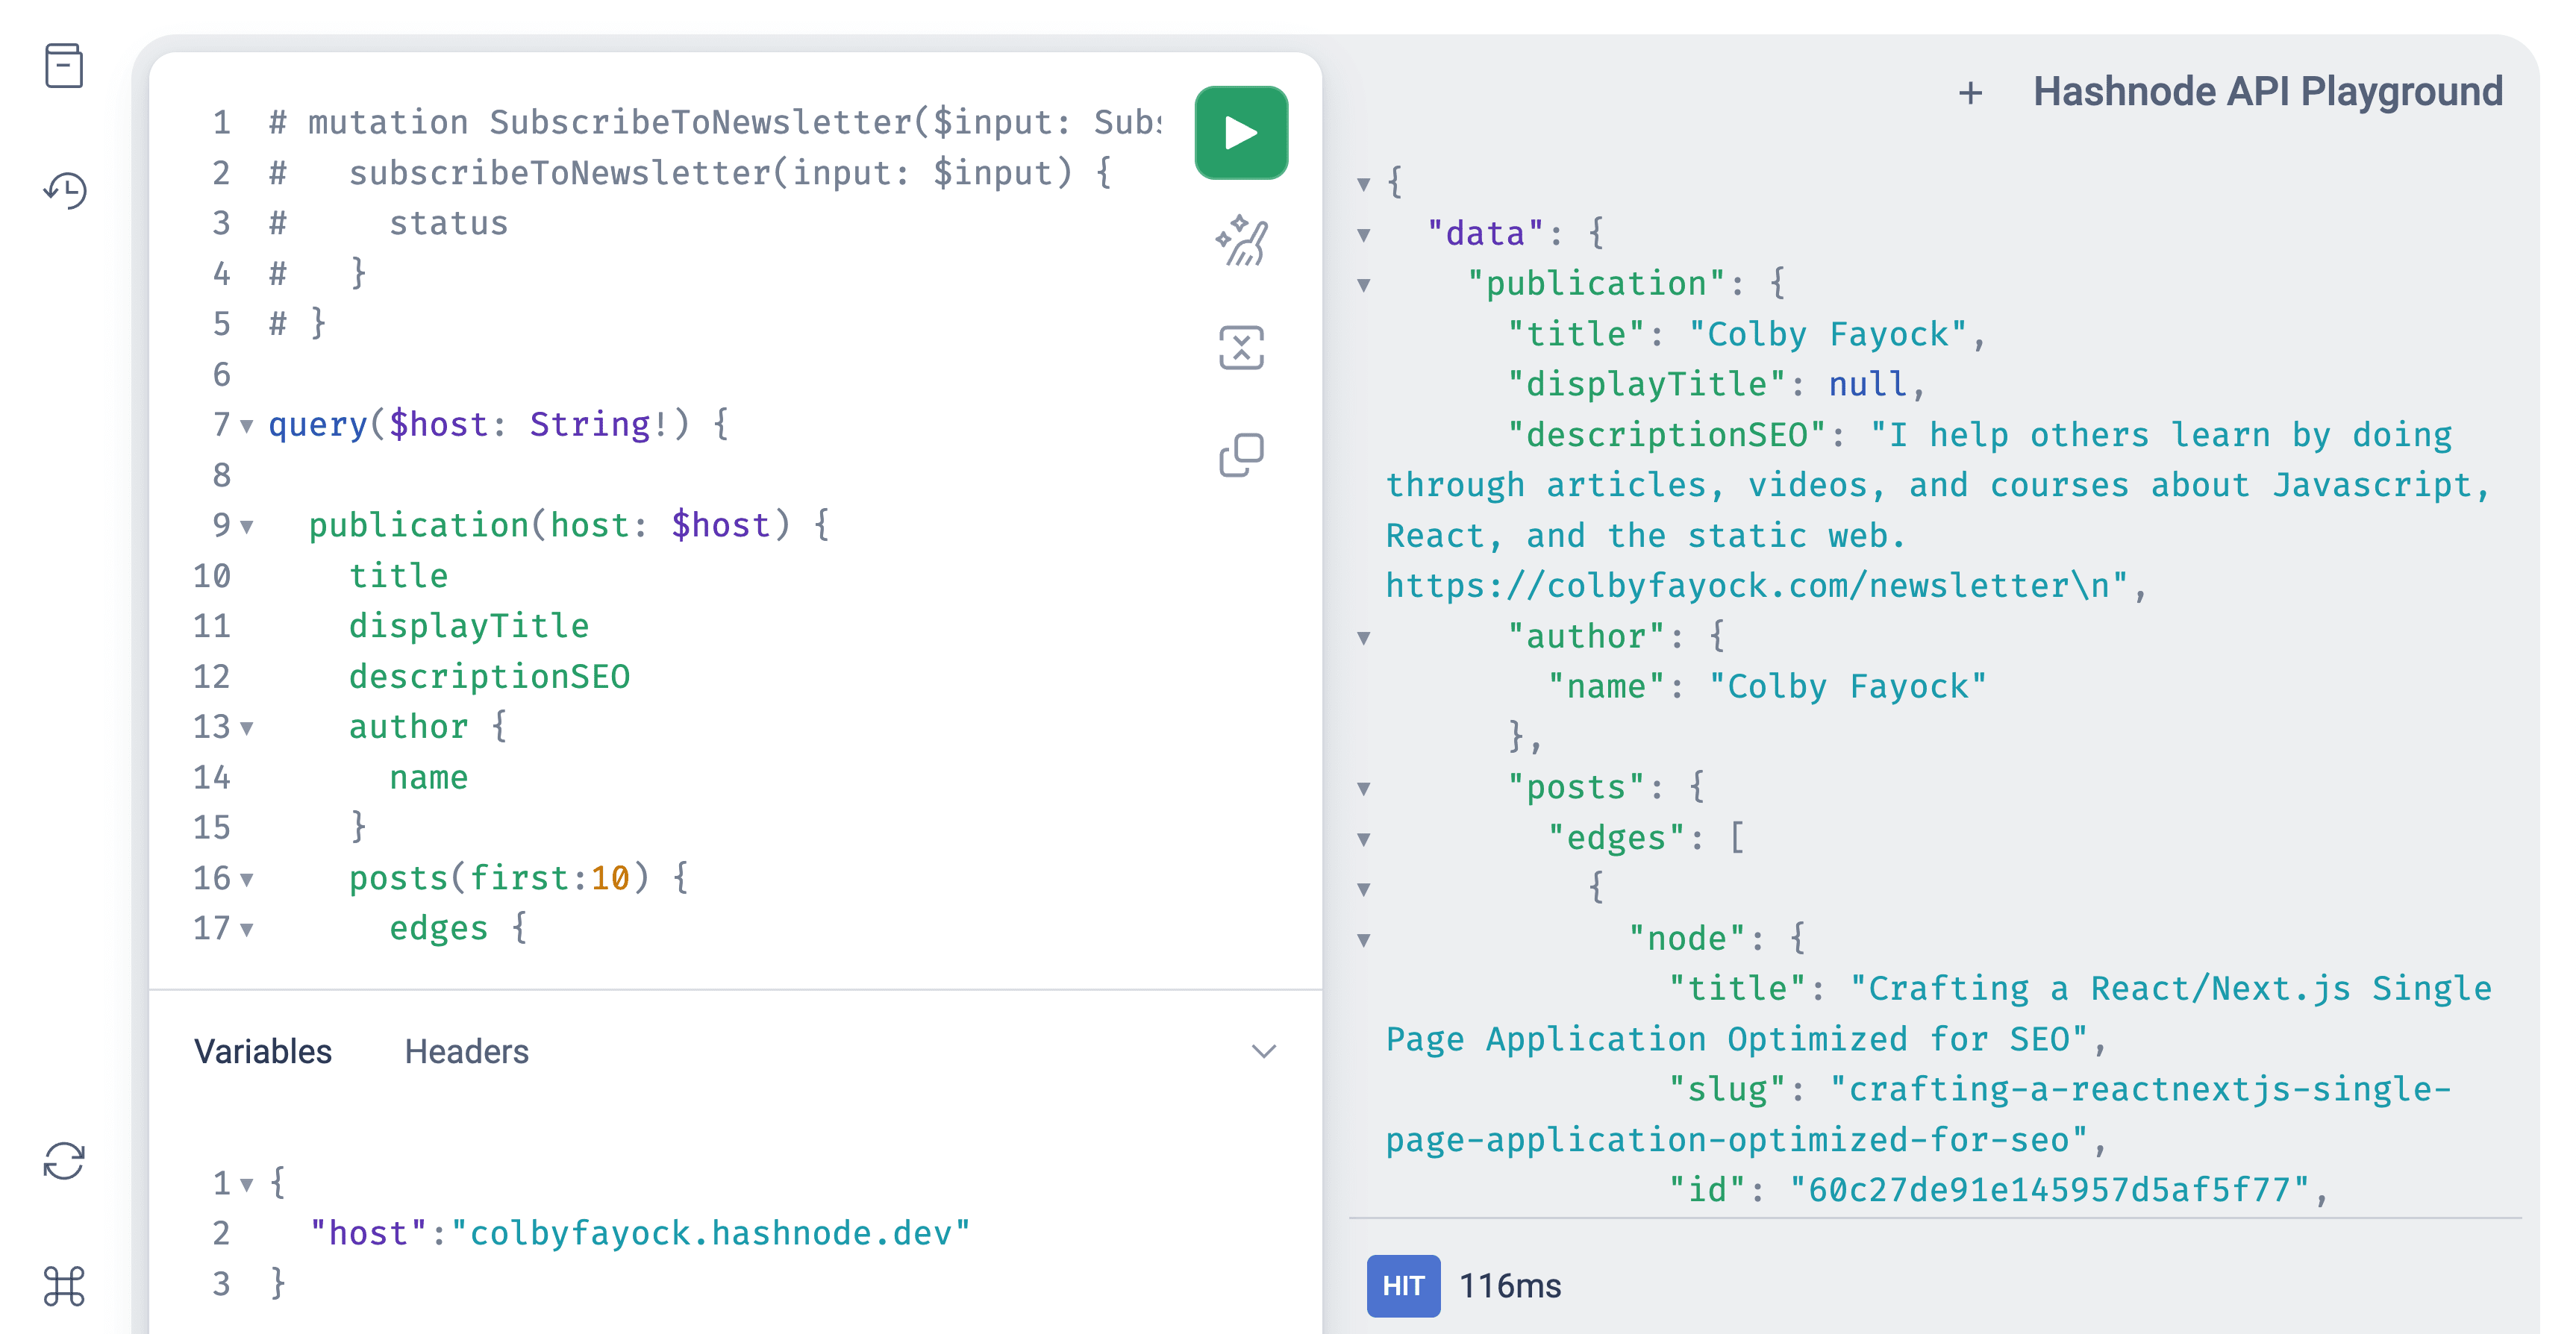
https://apidocs.hashnode.com/#mutation-subscribeToNewsletter
Configure analytics
Hashnode comes with built-in analytics, but because we're not publishing it on our own, we need a way to communicate back to Hashnode everything that's going on on our site.
Check out the Starter Kit for more examples
If you want to take a look at a comprehensive example of using Headless Hashnode, the Starter Kit is a great place.
You have the option of picking out bits and pieces to pull into your application or with this fundamental knowledge, start fresh and customize it to how you want!
https://github.com/Hashnode/starter-kit


